Biomod/2013/Sendai/experiment
<html> <head> <style>
/********************** Hide MediaWiki and init CSS, overwrite by bootstrap.css バルス**********************/
body{
background:none;
} html, body, div, span, applet, object, iframe, h1, h2, h3, h4, h5, h6, p, blockquote, pre, a, abbr, acronym, address, big, cite, code, del, dfn, em, img, ins, kbd, q, s, samp, small, strike, strong, sub, sup, tt, var, b, u, i, center, dl, dt, dd, ol, ul, li, fieldset, form, label, legend, table, caption, tbody, tfoot, thead, tr, th, td, article, aside, canvas, details, embed, figure, figcaption, footer, header, hgroup, menu, nav, output, ruby, section, summary, time, mark, audio, video{
margin:0;
padding:0;
/* font-size:100%; */
 border:0;
outline:0;
} a, a:link, a:visited, a:hover, a:active{
text-decoration:none
}
/*訪れたリンクを白くするよ*/ .whiteSendai:visited{
color:#FFFFFF!important;
}
/*左詰め、真ん中、右詰め*/ .leftSendai { text-align: left; } .centerSendai { text-align: center; } .rightSendai { text-align: right; }
.firstHeading {
display:none;
}
- content{
border-style:none;
margin:0;
padding:0;
}
- globalWrapper{
font-size:100%;
}
- contentSub{
display:none;
}
- column-one{
display:none;
}
- footer{
display:none;
}
- globalWrapper{
font-size:100%;
}
- bodyContent h1, #bodyContent h2{
 margin-top: 20px;
 margin-bottom: 10px;
}
- bodyContent h3{
 margin-top: 20px;
 margin-bottom: 10px;
 border-bottom-width: medium;
 border-bottom-style: solid;
 border-bottom-color: gray;
}
- bodyContent h4{
 margin-top: 20px;
 margin-bottom: 10px;
 border-bottom-width: thin;
 border-bottom-style: solid;
 border-bottom-color: gray;
}
- bodyContent h5, #bodyContent h6{
 margin-top: 10px;
 margin-bottom: 10px;
/**** border-bottom-width: thin;
 border-bottom-style: solid;
 border-bottom-color: gray;
- /
}
/********************************* Hide MediaWiki end *********************************/
/* Structure */ html{ background: #eee; } body {
 padding: 0px;
 background: #fff;
 color: #333;
 margin: 0 auto;
 max-width: 900px;
 font: 1em/1.5 "Helvetica Neue", Helvetica, Arial, sans-serif;
 }
a {
color: #105672;
}
header {/****position: fixed; ****/
       /******width: 100%;****/
       height: 90px;
       z-index: 1;
background: #F17F25;
padding:0.01em 0.5em 1.5em ;
color: #fff; line-height: 1;
}
header h1{ margin-bottom: 0; }
header h1 span{ display: inline; color: rgba(255,255,255,.4); }
header span{ display: block; color: rgba(255,255,255,.2); font-weight: 300; margin-bottom: 1.6em }
header nav{ float: right; text-align: right } header nav div{ font-size: .8em; } header nav div a { font-weight: 300; padding: .3em .5em } header nav a{ color: #fff; display: inline-block; padding: .3em .8em }
header nav a:hover, header nav a:focus{ color: rgba(255,255,255,.6) }
[role=main]{
padding:1.5em 3em;
}
article{
padding: 1em 0;
text-align: justify;
text-justify: inter-ideograph;
}
footer{
background: #333;
color: #fff;
padding: 1em 3em;
clear: both; /***2段組みの左右のfloatを解除***/
}
/* Typography */
p{ font: 1em/1.5 Palatino, "Palatino Linotype", Georgia, Times, "Times New Roman", serif; }
p.sukima{
       font-size: 150%;
       font-weight: normal;
       font-family: Helvetica;
       background: #bbb;
       padding-left: 1.2em;
}
img{ max-width: 100%; /***** height: auto; *****/ }
blockquote{
float: left;
margin: 1em 3em;
}
blockquote p{
font-size: 1.4em;
line-height: 1.2;
font-weight: 700;
font-style:italic;
}
a{
font: 700 1em/1.5 "Helvetica Neue", Helvetica, Arial, sans-serif;
text-decoration: none
}
a:hover, a:focus{
color: #000;
}
a:active{
position: relative;
top:1px;
}
ol{margin: 1em 0 1em 0; padding-left: 2em; } li{ margin: 0; }
/* Tabs */
- tabs
{ /*****position:fixed;****/
width: 900px;
}
.js-on #tabs article { display:none }
- tabs, #tabs nav a.active{
background: #FFF; color: #111; }
- tabs nav
{ position: relative; overflow: hidden; display: table; background: #bbb; }
- tabs nav a
{ width:900px; display:table-cell; padding:1em; text-align:center; color: #333; }
- tabs nav a:hover,#tabs nav a:focus
{ background:#eee }
- tabs article
{ padding:2em; }
.js-on #tabs article.active
{
display:block;
}
- tabs #mobiles{
display:none; border-radius: 0; }
- tabs #mobiles a, #tabs #mobiles a:first-child, #tabs #mobiles a:last-child{
width:300px; border-radius: 0; }
/* Media queries */ @media screen and (min-width:900px) { body{font-size: 1.1em;} }
@media screen and (max-width:600px) { #tabs nav{ display: none; position: relative; } #tabs #mobiles{ display:block; } #tabs article { display:block; } } @media screen and (max-width:480px) { blockquote{ float: none; }
header nav a{ padding:.7em .8em } header nav{ float: none; margin: -.5em -3em 0; background: #000; overflow: hidden; text-align: left } header nav a{ border-right: 1px solid #222 } [role=main]{ padding:1.5em 2em; } header nav div{ display: none; }
}
/*column content*/
- content-right {
width:48%; /***段落の横幅***/ float:right; /***右に寄せる(他の要素を左に回り込ませる)***/ margin: 10px; }
- content-left {
width:47%; /***サイドの横幅***/ float:left; /***左に寄せる***/ margin: 10px; }
/*****キャプションレフト*****/
div.caption-left{ float: left; padding: 0 5px 5px 5px; }
.caption-left span{ display: block; text-align: center;
       font-size: smaller;
       font-weight: bold;
}
div.clear{ clear: both; margin: 0 0 10px 0; }
/*****キャプションライト*****/
div.caption-right{ float: right; padding: 0 5px 5px 5px; }
.caption-right span{ display: block; text-align: center;
       font-size: smaller;
       font-weight: bold;
}
div.clear{ clear: both; margin: 0 0 10px 0; }
/***floatの影響を絶つ。
のように使う***/
.c-both { clear: both; }
div.title{
        font-style: normal;
        font-weight: bold;
        font-size: 70px;
        line-height: 70px;
        font-family: Helvetica;
}
div.caption{
       text-align: center;
       font-size: smaller;
       font-weight: bold;
}
div.captiontable{
       font-size: smaller;
       font-weight: bold;
}
/*topに戻る*/
- ttop {position:fixed;
      bottom:140px;
      left:auto;margin:0 0 0 905px; /* マージン:上 右 下 左 */
      width:100px;
      height:390px;
      background:url(http://openwetware.org/images/f/f2/%E5%90%8D%E7%A7%B0%E6%9C%AA%E8%A8%AD%E5%AE%9A-1.png) no-repeat left bottom;}
/* IE6以下用、アスタリスクハックでググれ */
- html #ttop {margin:0 0 -390px 0;
             position:relative;bottom:490px; /* 上で設定した ttopの高さ390px+下100px */
             left:960px;}
- ttop:hover {background:url(http://openwetware.org/images/b/b9/Top2.png) no-repeat left bottom;/* 画像の高さによって適当に調整 */
}
a.page_top {display:block;width:100px;height:390px;}
</style>
</head>
</html>
<html xmlns="http://www.w3.org/1999/xhtml">
<head>
   <title>Biomod2013 Sendai ver2.0</title>
   <meta name="viewport" content="width=device-width,initial-scale=1">

   <style type="text/css">
   h1{color: white;}
   </style>
</head>
<body>
<header>
<nav>
          <a href="http://openwetware.org/wiki/Biomod/2013/Sendai" class="whiteSendai">Top</a>
           <a href="http://openwetware.org/wiki/Biomod/2013/Sendai/project" class="whiteSendai">Project</a>
           <a href="http://openwetware.org/wiki/Biomod/2013/Sendai/design" class="whiteSendai">Design</a>
           <a href="http://openwetware.org/wiki/Biomod/2013/Sendai/calcuation" class="whiteSendai">Calculation</a>
           <a href="http://openwetware.org/wiki/Biomod/2013/Sendai/experiment" class="whiteSendai">Experiment</a>
<a href="http://openwetware.org/wiki/Biomod/2013" class="whiteSendai" style="float:right;"><img src="http://openwetware.org/images/6/6e/Biomod-logo.jpg"
                                              width="75" height="75" alt="Biomod2013" border="0"></a>

           <a href="http://openwetware.org/wiki/Biomod/2013/Sendai/protocol" class="whiteSendai">Protocol</a>
           <a href="http://openwetware.org/wiki/Biomod/2013/Sendai/future" class="whiteSendai">Future</a>
           <a href="http://openwetware.org/wiki/Biomod/2013/Sendai/member" class="whiteSendai">Member</a>
           <a href="http://openwetware.org/wiki/Biomod/2013/Sendai/sponsor" class="whiteSendai">Sponsor</a>
           </nav>
<a href="http://openwetware.org/wiki/Biomod/2013/Sendai">
Biomod2013
TeamSendai
</a>
</header>
<article>
Experiment
Contents
|
1st stage: Sensing system
1-1Disruption of temperature sensitive liposomes
Purpose
In our project, we planned to use liposomes conjugated with NIPAM polymer as a chain reaction initiator. NIPAM (poly-N-isopropyl acrylamide) is a temperature sensitive molecule that has a unique critical temperature (Tc: 32~40˚C ).
When the temperature increased over than Tc, the hydrophilic polymer changes its property hydrophobic. It is expected that the change should disrupt the membrane lipid alignment. Here we confirm that the possibility of breaking liposomes with NIPAM by increasing temperature.
NIPAM was purchesed from <A href="http://www.sigmaaldrich.com/Graphics/COfAInfo/SigmaSAPQM/SPEC/73/731129/731129-BULK_______ALDRICH__.pdf">Sigma Aldrich</A>
Method
The liposomes were prepared by natural swelling method. Obtained sample included a mixture of unilamellar and multilamellar liposomes.
Then we added NIPAM-conjugated lipids (dissolved in ultra pure water (Milli-Q)) to the liposomes solution.
The liposomes were observed on the slide glass by phase-contrast microscopy.
After confirming the formation of the liposomes, a petri dish with hot water (~90˚C) was put on the sample slide glass to increase the temperature.
Detailed Protocol
(対応するプロトコルへのリンク)
Result
<img src="http://openwetware.org/images/thumb/2/2b/Experiment_%E3%83%8B%E3%83%83%E3%83%91%E3%83%A04.png/800px-Experiment_%E3%83%8B%E3%83%83%E3%83%91%E3%83%A04.png" width="60%" height="60%">
Fig.1 Phase contrast images of liposomes in NIPAM solution. Temperature increased from RT to enough over than Tc (left to right).
Fig.1 shows the continuous images before and after the temperature increase. The view sight was the same position.
NIPAM polymer turned into globular states with increasing temperature. Liposomes disappeared by increasing temperature (> Tc).
Discussion
Thermosensitive polymer NIPAM can disrupt the coexisting liposomes by the polymers phase transition.
On the other hand, some liposomes still present even at the high temperature. In this experiment, some fractions were multi-lamellar liposomes. Since globular states of NIPAM (hydrophobic) at high temperature attack the liposome membrane from the outside, it is not surprising that the multi-lamellar liposomes consist of many lipid bilayers are more difficult to disrupt. Therefore, we suppose that liposomes disrupted by temperature shift in Fig.1 were uni-lamella ones. These results confirmed that triggering by heat disrupted the liposomes.
2nd stage: Amplification system
2-1 DNA Origami approach
2-1-1 Making DNA Origami
Purpose
In our project, we use DNA Origami as Key DNA to break liposomes. We design rectangular DNA Origami with a chipped edge and try to make it.
Method
We mixed M13mp18, staples, 5xTAE Mg2+, and mQ in a microtube and annealed it for 2.5 hours.
<A href="http://openwetware.org/wiki/Biomod/2013/Sendai/protocol">Protocol</A>
Result
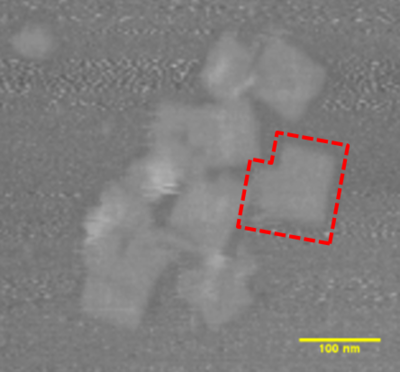
We confirmed that our DNA Origami was well formed by AFM (Atomic Force Microscope) (Fig.2).
<Img Src="http://openwetware.org/images/d/d9/Outsideafm2.png">
Fig.2 AFM image of DNA Origami (M13: 4nM, staples:20nM)
Discussion
Just like our design, rectangular DNA Origami with a chipped edge was observed.
2-1-2 Labeling DNA Origami with fluorescent-tagged DNA
Purpose
If Origami is fluorescently labeled, it is much easier to observe the effect of DNA Origami on liposomes. So we labeled our Origami by hybridizing it with fluorescent-tagged DNA strand.
Method
Our DNA Origami has many staples that can bind to fluorescent-tagged DNA for labeling. We mixed fluorescent-tagged DNA together with DNA Origami staples in annealing solution.
In addition, to see if the Origami binds to the fluorescent-tagged DNA in a shorter time, we added the fluorescent-tagged DNA into the control annealing solution, which had contained no fluorescent-tagged DNA, and left it for 40 minutes.
To see the Origami was well labeled with fluorescent molecules, we used electrophoresis.
Electrophoresis was conducted with a 1% agarose gel, CV100V for 50 minutes.
<A href="http://openwetware.org/wiki/Biomod/2013/Sendai/protocol">Protocol</A>
By scanning a gel before staining, we can see only the bands of DNA structures with fluorescent molecules; scanning a gel after staining, we can see the bands of all DNA structures. So we scanned a gel before and after staining (we scanned both a non-stained and a stained gel).
First we saw the bands of our Origami in a non-stained gel. Then, we compared the bands with those in a stained gel. If the bands of Origami in a non-stained gel were at the same height as that in a stained gel, we can say that our Origami was successfully fluorescently labeled.
Result
In a non-stained gel (Fig.3), only bands in lane 3 and 4 from the left (*Ori, **Ori) can be seen. They are fluorescently labeled structures. In addition, as they gave the same result, 40 minutes is long enough for fluorescently labeling.
<Img Src="http://openwetware.org/images/8/8e/Fig5and6.jpg" width="450">
Fig.3 Non-stained gel image: only bands in two lanes can be seen. From the left, they are DNA Origami with fluorescent molecules in pre-annealing (Ori*), and DNA Origami with fluorescent molecules in post-annealing (Ori**)
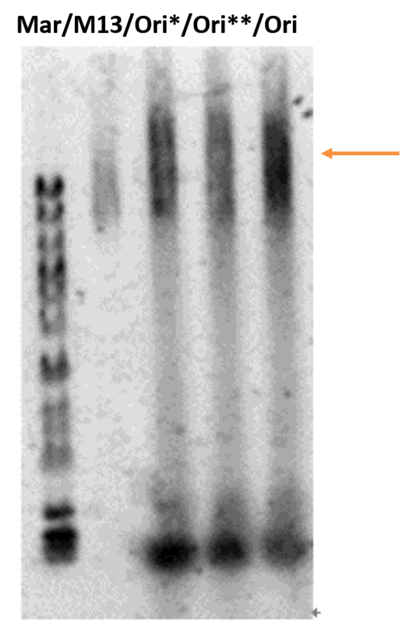
In a stained gel (Fig.4), marker lane (lane 1) had the longest DNA strand of 20kb. Comparing this band and the band of M13mp18 (lane 2) with annealed DNA Origami (lane 1,2,3), the bands of the Origami are at the higher position. Therefore, we concluded that in lane3~5, DNA Origami structure was made as we had expected.
We considered that the bands in lane3~5 are seen as if they were diffused, just because our Origami has many staples binding to the fluorescent-tagged DNA, and each Origami attaches to different number of them, and its molecular weight varies.
<Img Src="http://openwetware.org/images/2/2d/S_Outside-gel-2.2.png" width="300">
Fig.4 Stained gel image: from the left, marker, M13mp18, Ori*, Ori**, and DNA Origami with no fluorescent molecule (Ori)
Discussion
Combining the results of Fig.3 and 4, the fluorescently labeled bands in lane3 and 4 in Fig.3 are at the same height as those of DNA Origami in Fig.4. Thus, we concluded our Origami was successfully fluorescently labeled.
2-1-3 Disrupting liposomes by DNA Origami
Purpose
To break liposomes with our Origami, first we investigate how our DNA Origami affect liposomes.
Principle
To break liposomes with our Origami, a lot of Origami has to hybridize to the surface of the liposomes.
To begin with, we added cholesterol-conjugated single-stranded DNA (in the rest of this document, referred to as Origami-anchor DNA) into liposomes, and made it float on the surface. The Origami-anchor DNA has a complementary part to our Origami, so the Origami is expected to hybridize to Origami-anchor DNA on the liposomes. In this way, lots of Origami would hybridize to liposomes via Origami-anchor DNA.
Method
We added Origami-anchor DNA into liposomes at the final concentration of 0.018, 0.069, 1.8, and 6.9µM. Then we observed the samples with a phase microscope.
Next, adding fluorescently labeled DNA Origami into the above liposomes, we saw if some change would happen with a fluorescent microscope.
<A href="http://openwetware.org/wiki/Biomod/2013/Sendai/protocol">Protocol</A>
Result
In all four conditions, liposomes were observed with a phase microscope. We confirmed the formation of multi-lamella liposomes (Fig.5~8).
<Img Src="http://openwetware.org/images/7/72/Lipofig4.png" width="400">
Fig.5 Phase microscope image of liposomes (Origami-anchor DNA: 0.018µM)
<Img Src="http://openwetware.org/images/d/d0/Lipofig5.png" width="400">
Fig.6 Phase microscope image of liposomes (Origami-anchor DNA: 0.069µM)
<Img Src="http://openwetware.org/images/d/de/Lipofig6.png" width="400">
Fig.7 Phase microscope image of liposomes (Origami-anchor DNA: 1.8µM)
<Img Src="http://openwetware.org/images/d/d7/Lipofig7.png" width="400">
Fig.8 Phase microscope image of liposomes (Orgami-anchor DNA: 6.9µM)
Adding fluorescently labeled DNA Origami into the above liposomes, we saw if some change would happen with a fluorescent microscope.
When the concentration of Origami-anchor DNA was 0.018, 0.069µM, many gleaming (in green color) liposomes were observed. We confirmed that the fluorescently labeled Origami well hybridized to the liposomal surface (Fig.9,10,11).
<Img Src="http://openwetware.org/images/6/6c/Lipofig8.png" width="400"> |
<Img Src="http://openwetware.org/images/a/a6/Lipofig9.png" width="400"> |
Fig.9,10 fluorescent microscope image of liposomes (Origami-anchor DNA: 0.018µM)
<Img Src="http://openwetware.org/images/b/b4/Lipofig10.png" width="400">
Fig.11 fluorescent microscope image of liposomes (Origami-anchor DNA: 0.069µM)
On the other hand, when the concentration of Origami-anchor DNA was 1.8µM, few gleaming liposomes could be seen with a fluorescent microscope (Fig.12). This result indicates the possibility that liposomes have broken.
<Img Src="http://openwetware.org/images/1/18/Lipofig11.png" width="400">
Fig.12 fluorescent microscope image of liposomes (Origami-anchor DNA: 1.8µM)
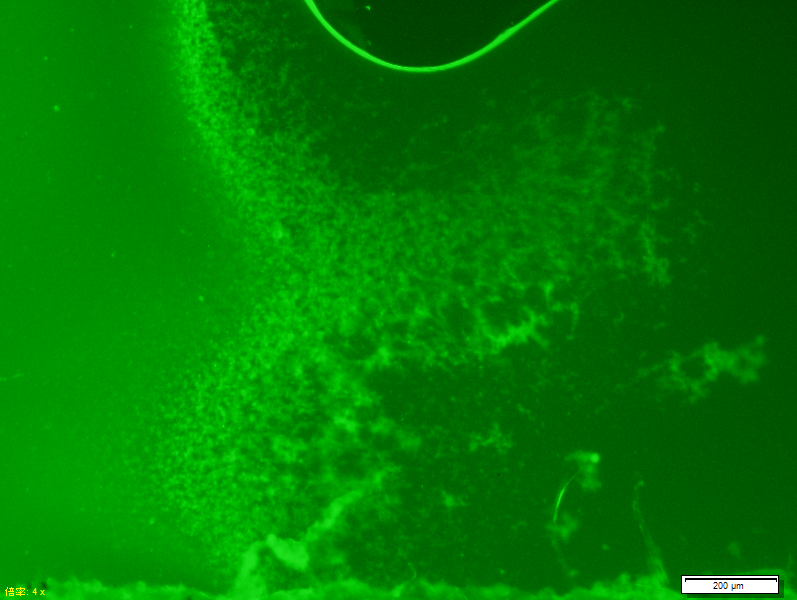
When the concentration of Origami-anchor DNA is 6.9µM, some liposomes were gleaming and others distorted, forming networks (Fig.13).
<Img Src="http://openwetware.org/images/8/88/Lipofig12.png" width="400">
Fig.13 fluorescent microscope image of liposomes (Origami-anchor DNA: 6.9µM)
Discussion
From these results, we put forward the following hypothesis about the interaction of DNA Origami and liposomes.
When the concentration of Origami-anchor DNA is low (0.018, 0.069µM), DNA Origami hybridizes to the surface of liposomes relatively stablely. When the concentration is middle (1.8µM), more DNA Origami hybridizes to the surface and loads on it. The liposomes become fragile and easy to break. When the concentration is high (6.9µM), some liposomes exist individually, and others form networks via Origami-anchor DNA and DNA Origami complex.
<Img Src="http://openwetware.org/images/7/7c/Experimentinsidefig.png">
According to this hypothesis, when the concentration of Origami-anchor DNA is 1.8µM, DNA Origami breaks liposomes.
2-1-3 Disrupting liposomes by DNA Origami その2
Purpose
To break liposomes with our Origami, first we investigate how our DNA Origami affect liposomes.
Method
1. Making liposomes that contain GFP in the interior, by an oil/water interface.
2. Observing only liposomes by the confocal microscope.
3. Sample 1. Liposomes + Flower-anchor DNA + Key DNA
Sample 2. Liposomes + Flower-anchor DNA
Sample 3. Liposomes + Flower-anchor DNA + Surfactant (2%NP)
Measuring each sample’s fluorescence intensity of 7-13㎛ diameter liposomes by Cell Lab Quanta SC Flow Cytometer
We used 50㎕ from each sample.
内部にGFP(緑の蛍光)を含むリポソームを界面通過法によって作成した。リポソームのみを共焦点顕微鏡により観察した。
次に、
サンプル1 リポソーム+フラワーアンカーDNA+KeyDNA
サンプル2 リポソーム+フラワーアンカーDNA
サンプル3 リポソーム+フラワーアンカーDNA+界面活性剤(2%NP)
を用意してそれぞれをCell Lab Quanta SC Flow Cytometerで直径が7~13μm??(片山さん確認)のリポソームの個数蛍光強度を計測する。サンプルは各50ul使用する。
Result
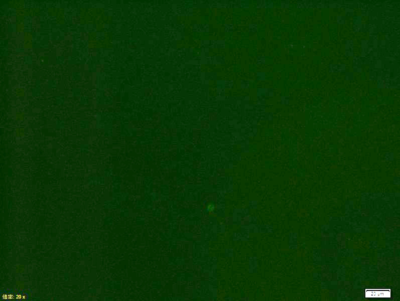
As figure below, we was able to observe liposomes containing GFP, by the confocal microscope.
共焦点顕微鏡によって観察したGFP入りのリポソームは下図のようになり、リポソームが確認できた。
(共焦点の図)
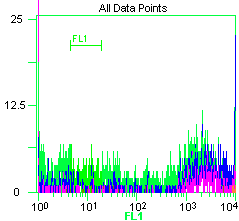
The abscissa of the following graph is the fluorescence intensity of only liposomes, and the ordinate represents the number of liposomes.
以下のグラフの横軸はリポソームのみの蛍光強度、縦軸はリポソームの個数を表している。
<img src="http://openwetware.org/images/b/bc/%E3%81%90%E3%82%89%E3%81%B5%EF%BC%91.png">
グラフ1 Lipo-leg-tae-graph
<img src="http://openwetware.org/images/9/9c/%E3%82%B0%E3%83%A9%E3%83%95%EF%BC%92.png">
グラフ2 Lipo-leg-origami-graph
<img src="http://openwetware.org/images/4/4a/%E3%81%90%E3%82%89%E3%81%B5%EF%BC%93.png">
グラフ3 Lipo-leg-origami2-graph
Figure 1 shows that liposomes having high fluorescence intensity have a wide distribution.
グラフ1は蛍光強度が高いリポソームの分布が多い。
Figure 2 shows the result of liposomes including Origami-anchor DNA and DNA origami. Fluorescence intensity was not observed at all.
グラフ2はオリガミアンカーDNAとDNAオリガミをくわえたものである。蛍光強度がまったく観測されなかった。
Figure 3 a surfactant shows
グラフ3はポジティブコントロールの界面活性剤を加えたものである。こちらも蛍光強度がまったく観測されなかった。
Discussion
グラフ1はリポソームが確実にあるときの分布、グラフ3は界面活性剤によりほぼ確実にリポソームないときの分布である。グラフ2はグラフ3と似ている。そのためグラフ2ではリポソームが割れていると考えられる。本実験によりDNAオリガミによってリポソームが破壊できたと考えられる。
2-1-4 Confirming sequence specificity of DNA
Purpose
In this project, we adopt DNA for the Key of chain reaction because DNA has a significant characteristic: sequence specificity. Utilizing this sequence specificity, we aim to select liposomes that will be broken by Key DNA, induce chain-reactive liposomal disruption by some Key DNA, and make connections between liposomes.
Corresponding to the liposomes, we arrange two kinds of Origami-anchor DNA of different sequences and attach the anchor to the liposomes. Then we mix both kinds of liposomes together.
Into the mixture, Key DNA for just one kind of liposomes is added. We confirm that the Key DNA breaks only the corresponding kind of liposomes.
Method
We made two kinds of liposomes: liposomeA and liposomeB by water-in-oil emulsion process. LiposomeA contains GFP (Green Fluorescent Protein) inside, and liposomeB has Rhodamine (red fluorescent dye) in itself.
Origami-anchor DNA for liposome A has the sequence of 5'-CCAGAAGACG-chol-3'. The anchor for liposome B has the sequence of 5'-TCCACTAACG-chol-3'. Both Origami-anchor DNA was mixed with the corresponding liposomes.
Each liposome was centrifuged for one minute to remove the excess Origami- anchor DNA.
Then we mixed 1µl of each liposome and observed it with a phase-contrast microscope.
Next, 4µl refined DNA Origami was added to the mixture (of liposomeA and B). The sample was also observed with a phase-contrast microscope.
Protocol
(対応するプロトコルへのリンク)
Result
Fig.16 is the phase-contrast microscope image of the mixture of liposome A and B before the addition of Key DNA Origami.
<img src="http://openwetware.org/images/6/68/LegA%2BB_10.jpg">
Fig.16 Phase contrast microscope image of the mixture of liposome A (Green) and B (Red)
Discussion
(要加筆)
2-2 Flower DNA approach
(SPRコメントアウトしておきます)
2-2-1フラワーミセルによりリポソームを破壊する実験
Purpose
In Flower DNA approach, Key DNA should attach to Flower-anchor DNA on liposomes and break them. This experiment is conducted for the confirmation of it.
フラワーミセルアプローチでは鍵DNAがリポソーム表面に生えているフラワーアンカーDNAにハイブリしてリポソームが割れる必要がある。それを確かめるために本実験を行った。
Method
We made phase-separated liposomes (DOPC: DPPC: cholesterol= 1: 1: 1) with rhodamine dye inside by water-in-oil emulsion process. Then flower-anchor DNA (stained with SYBR Gold) was added into the liposomes.
Next, we added Key DNA into the liposomes. The liposomes were observed in a chamber on a slide glass with a fluorescent microscope.
内部にローダミンを含む相分離リポソーム(DOPC:DPPC:cholesterol=1:1:1)を界面通過法により作製して、リポソームにサイバーゴールドで染色したフラワーアンカーDNAを加えて、そのあとキーDNAを加えた。チャンバーinスライドガラスを使って位相差顕微鏡で観察した。
Result
<img src="http://openwetware.org/images/4/47/%EF%BC%91%EF%BC%8D%EF%BC%91.png">
<img src="http://openwetware.org/images/d/d6/%EF%BC%91%EF%BC%8D%EF%BC%92.png">
<img src="http://openwetware.org/images/0/05/%EF%BC%91%EF%BC%8D%EF%BC%93.png">
蛍光顕微鏡(赤 波長後で聞く)で観察したところ、リポソームが縮んでいる様子が観察された。波長を??(緑)に変更するとサイバーゴールドで染色されたフラワーアンカーDNAが光る。縮んだリポソームの周りが緑に発光しているのを確認できた。
<img src="http://openwetware.org/images/5/5e/%EF%BC%92%EF%BC%8D%EF%BC%91.png">
<img src="http://openwetware.org/images/e/ea/%EF%BC%92%EF%BC%8D%EF%BC%92.png">
チャンバーを使って観察したのでトリガー溶液とリポソーム溶液が混合している様子を観察した。上図のさかい目の右側がトリガー溶液、左側がリポソーム溶液である。両者の境目で発光するネットワークのようなものが確認できた。
<img src="http://openwetware.org/images/f/f6/%EF%BC%93%EF%BC%8D%EF%BC%91.png">
<img src="http://openwetware.org/images/5/53/%EF%BC%93%EF%BC%8D%EF%BC%92.png">
<img src="openwetware.org/images/e/e0/3-3.png">
境目のネットワークの部分を拡大すると中がデキストリンTXR(赤)で染色されていないリポソームが確認できた。波長を緑に変えるとリポソームの周りが緑に染色されていた。
Discussion
1段目リポソームが縮んだのでフラワーによるリポソーム破壊が起こっている可能性がある
2段目境目のネットワーク構造はリポソームが割れた残骸かもしれない。(緑に光るのはフラワーアンカーDNAのみであるため)
3段目なかが染色されていないリポソームは膜の一部が割れて内部の蛍光が漏れたものではないかと考えられる。
</article>
<footer>
© Copyright Biomod 2013 Team Sendai <a href="http://www.molbot.mech.tohoku.ac.jp/index.html"> <img src="http://openwetware.org/images/3/36/Murata-nomura-logo.png" width="180" height="50" alt="Molcular Robotics Lab" border="0" align="right"> </a>
E-MAIL: <a href="mailto:biomod.teamsendai.2012@gmail.com">biomod.teamsendai.2012@gmail.com </a>
<a href="?action=edit" align="center">
edit
</a>
</footer>
</body> </html>
<html> <head>
       <script type="text/javascript">
     function tabs(a,g,j){document.body.className="js-on";var g=a.getElementsByTagName(g),d=[],c;this.active;this.total=g.length;this.container=a;e=a.insertBefore(document.createElement("nav"),g[0]),change=function(f){if(typeof this.active!=="undefined"){d[this.active].className=g[this.active].className=""}d[f].className=g[f].className="active";this.active=f},clickEvent=function(h,f){h.onclick=function(){change(f);return false}};for(var b=0;b<g.length;b++){d[b]=e.appendChild(document.createElement("a"));d[b].href="#";c=[g[b].getAttribute("data-title"),g[b].getElementsByTagName(j)[0]];d[b].innerHTML=c[0]!==null?c[0]:c[1]?c[1]["innerText"||"textContent"]:b+1;new clickEvent(d[b],b)}change(0)}tabs.prototype.change=function(b){change(b-1)};tabs.prototype.next=function(b){active===this.total-1?change(0):change(active+1)};tabs.prototype.prev=function(b){active===0?change(this.total-1):change(active-1)};tabs.prototype.responsive=function(d,c){nav=document.createElement("nav");nav.id="mobiles";nav.innerHTML='<a href="#" onclick="'+d+'.prev(); return false">'+c.prev+'</a><a href="#" onclick="'+d+'.next(); return false">'+c.next+"</a>";this.container.insertBefore(nav,this.container.firstChild);return this};
       </script>
       <script type="text/javascript">
var myTabs = new tabs(document.getElementById("tabs"), "article", "h2").responsive("myTabs", { prev: "Previous", next: "Next" }); </script> </head> </html>
