BISC209/S11: Lab6: Difference between revisions
Tucker Crum (talk | contribs) |
Tucker Crum (talk | contribs) |
||
| Line 30: | Line 30: | ||
The sequences should come back in a week or two. | The sequences should come back in a week or two. | ||
=='''Culture-Dependent Isolate Characterizations'''== | =='''Culture-Dependent Isolate Characterizations: Examples of Competition and Co-operation in Selected Soil Community Bacteria'''== | ||
==Assessing Bacterial Morphology and Characteristic Arrangement and Cell Wall Composition by Gram Stain == | ==Assessing Bacterial Morphology and Characteristic Arrangement and Cell Wall Composition by Gram Stain == | ||
Revision as of 13:13, 27 February 2011

LAB 6: Finishing the Culture-Independent Identification of Bacteria by 16s rRNA Gene Sequence Analysis
To summarize our culture-independent work, you have extracted genomic DNA from a soil sample, amplified the 16S rDNA by pcr using "universal bacterial primers", inserted the different 16s rDNA fragments from your pcr product into a cloning vector, and transformed special genetically modified E. coli with a plasmid in order to separate and amplify the 16s rRNA genes from different bacterial members of your soil community. Now you are ready to pick transformants that successfully incorporated the plasmid vector genes.
Activity:
Preparing your clones to send away for sequencing analysis of your 16S rRNA gene
When you examine your transformation plates after their initial overnight incubation, there should have been hundreds of well isolated colonies. In theory, each of them should contain the vector plasmid with an insert of the 16s rRNA gene from one of your soil sample bacteria. Because the vector plasmid contains a kanamycin resistance gene, kanamycin resistance is a selectable marker. Kanamycin is an antimicrobial compound that disrupts bacterial protein synthesis and kills the cells. The genetically engineered strain of E. coli that we transformed is sensitive to kanamycin; therefore, E. coli that did not take up a cloning vector plasmid and express its genes should not form colonies on media with kanamycin.
There are two reasons that we are able to determine that the vector plasmids in the transformed E. coli that formed colonies on your plates contain a 16S rRNA gene insert from the genomic DNA isolated from your soil sample. First, there is a ccdB gene in the insertion region of the vector plasmid. That gene, ccdB, means "control of cell death". That gene, when not disrupted, expresses the ccdB protein that poisons bacterial DNA gyrase, causing degradation of the host chromosome and cell death. But the presence of your 16S rRNA gene insert has disrupted transcription of the ccdB gene and turned off expression of the protein that inhibits DNA gyrase, allowing the cell to live, replicate and form colonies that should appear white, NOT blue. The second reason that we know any white colonies are transformed with the vector plasmid that contains a soil bacterial 16s rRNa gene and that any blue colonies are likely to contain an "empty" vector (lacking a soil bacterial 16srRNA gene) is because there is a lacZ gene positioned next to the ccdB gene and transcription of BOTH is disrupted by ligation of a 16s rRNA gene insert. That transcription disruption turns off expression of the lacZ gene product, beta-galactosidase. Beta-galactosidase is an enzyme that catalyzes the breakdown of several substrates, including lactose and X-gal. X-gal is a colorless substrate that is cleaved into a blue colored product by beta-galactosidase. The Luria-Bertoni agar medium that the transformants grew on contains both kanamycin and Xgal. If you saw blue colonies, those bacteria are daughter cells from a vector transformed E. coli, BUT the vector plasmid probably does not contain the 16s DNA insert we seek because we can see that there was minimal disruption of expression of the lacZ gene. Therefore, you only want to pick "not-blue" colonies to send away for sequencing of the insert. We hope that there are hundreds of these not-blue colonies on your plate (but not so many that they are not well separated from each other since separation and amplification of individual soil bacterial 16srRNA genes was the goal of our cloning and transformation). We want to pick colonies containing 16s rRNA genes from DIFFERENT soil bacteria, but we have no way of detecting which white colony contains a 16s rRNA gene that is different from the 16s rRNA gene in the cells forming a different white colony. Since we can't sequence the gene in every colony on your plates, we will id a random sample.
We will fill one 96 well sterile block with 96 clones from each soil sample. Follow the directions below, carefully, to inoculate each well with a different, well isolated, non-blue colony.
Preparing Over-night Cultures to send away for 16s rRNA gene sequencing
1. We need to keep track of which DNA sequences come from which sampling site. Therefore, you should make sure that each sampling site has a separate, well-labeled 96 well plate. Put a piece of your color tape on both the cover and the bottom or side of a plate and make sure you label it with your sample code (A-F), your lab section (Tues or Wed, the date, and Wellesley College.
2. In the hoods in the lab, you will find 3 prep areas for transferring colonies to the 96 well block plates.
You will use your P1000 to inoculate well A1 with 1 ml (1000μL) of LB broth with 50 μg/ml kanamycin (NO X-gal).
3. Find and select a well-isolated, white colony from your transformation plates.
If the colony is large, use the flat end of a sterile toothpick to pick up that single colony. Be careful NOT to touch any of the area of the plate around the colony with your toothpick! Place the toothpick in a singe well of your 96 well block, starting at the beginning A1. Leave the toothpick in the well after inoculating it as added insurance that you can distinguish which wells have been inoculated and which have not!!!! If the colony is tiny you can use the sharp end of a sterile toothpick to pick up growth only from that colony. Make sure you have a visible amount of growth when you inoculate a well of your plate moving from A1, to A2, etc. Leave the toothpicks in the wells you have inoculated.
4. Once all the wells in your plate are filled with toothpicks, carefully pull out each toothpick by wiping it on the edge of the well (to scrape off the organism). Do this on a side of the well that will allow you to discard the toothpick without the chance of dripping this well's contents into another well. BE CAREFUL not to cross-contaminate any wells!!! Discard the toothpicks in the autoclave bag.
Once all 96 wells are inoculated, apply a sterile sealing mat carefully. Place your full block on a platform shaker at 37C and tape it down before turning on the shaker. Your block will incubate with constant shaking at 37C overnight.
Preparing Glycerol Stocks from your Overnight Cultures(Your instructor will do this part for you so make sure that your plate and wells are clearly identified!)
1. Pipet 50 μL of 50% glycerol in each well a 96 well Costar round bottom plate.
2. Mix each overnight culture from the 96 well block by pipetting up and down and transfer 50 μL of each culture into a separate well of Costar plate. Mix well.
3. Seal the plate with an aluminum foil special seal and label the plate clearly: Wellesley College, BISC209, Tues or Wed (for lab day), (sampling site code A-F) and the date.
4. Freeze at -80C and send away for sequencing on dry ice. Our sequences will be done by chain termination sequencing (fluorescence marker) which is also called Sanger sequencing at Beckman Coulter Genomics, 36 Cherry Hill Drive, Danvers, MA 01923 USA. (We are not getting high throughput pyrosequencing.)
The sequences should come back in a week or two.
Culture-Dependent Isolate Characterizations: Examples of Competition and Co-operation in Selected Soil Community Bacteria
Assessing Bacterial Morphology and Characteristic Arrangement and Cell Wall Composition by Gram Stain
Today you will make smear slides (explained here and in Protocols as Smear Slide Preparation)and perform Gram stains (found here and in protocols as Stains: Gram Stain.
Activity: Preparing a bacterial smear slide
1. Use a graphite pencil to label on the far left side of a clean, glass slide the code ID or name of three of your isolates. If you have more than 3 isolates, make two slides with no more than 3 organisms/slide.On another clean, glass slide, label the controls as SE (Staphylococcus epidermidis), EC (Escherichia coli), and EC/SE mix.
2. Prepare the "control" slide by using your loop to apply three tiny drops of deionized water to different parts of this pre-labeled slide. Flame sterilize the loop, allow it to cool for a few seconds and touch the cooled loop to a colony of the control culture plate of S. epidermidis. Pick up a VERY, VERY TINY bit of growth from a single bacterial colony. An invisible amount of growth obtained from just touching the cooled loop to the colony will give you plenty of bacteria. If you take a glob, the bacteria will be so thick, you will not get good stain results.
3. Place the loop with the bacterial growth into the drop of water. Use a circular motion with the loop to make a smooth suspension of the bacteria in the water. Stop when there is a circle of emulsified bacteria about the size of a nickle. Be sure to leave room for the adjacent drops of water to be spread to similar size circles without mixing the three smears. Reflame your loop and repeat the process of inoculating theE. coli control into both the middle drop of water and the drop of the far right. Mix the middle drop of E. coli in water as you did for the Staph on the left. Flame your loop and cool it for a few seconds. Touch your loop again to a Staphylococcus colony (just a TINY bit) and inoculate the drop of water on the far right, mixing the Staph with the E. coli. Spread the two bacteria evenly.
4.Now you are ready to make smears of your isolates. Using your best aseptic technique, flame sterilize your loop. Using one of the broth cultures of your isolates, remove the culture tube top (NOT placing it on the bench) and flame the lip of the culture tube. Dip your loop into the broth culture and place a VERY small drop of broth culture of that isolate on the appropriate place on the labeled slide. (The labeling from top to bottom should refer to isolates placed left to right.). Mix the drop with your loop to disperse the broth over an area that will not touch the next culture but will allow your slide to dry quickly. If you don't have a turbid broth culture for each of your isolates (turbidity is a measure of concentration of bacteria), you can apply a very small loopful of deionized water (bottle on your bench) to the slide and then add 1/8th of a pure colony from a fresh culture on solid medium and create a smear as you did for the controls. Mix. Repeat for the other two isolates on the slide.
5. Allow the slides to air dry completely! Be sure all the water on the slide has evaporated before proceeding to heat fixation!!! This drying step is crucially important. If you are impatient, you will "explode" the cells in the next step .
6. Heat fix (to kill and attach organisms to the slide) by passing the slide (smear side up) through a flame 3 times. Use a clothes pin or slide holder to avoid contact with hot glass.
An example of a multiple smear labeled slide:

The Gram Stain
Background on Using Stains in Bacteriology
The first of the dyes most useful to bacteriologists was a reddish violet dye, mauvein, synthesized in England by William. H. Perkin, and patented by him in 1856. This synthetic dye and others were immediately appreciated by histologists, but were not applied to bacterial cells until Carl Weigert (a cousin of Paul Ehrlich) used methyl violet to stain cocci in preparations of diseased tissue in 1875. Subsequently, the use of various synthetic dyes for bacteriological preparations developed rapidly when they were promoted through the publications of Robert Koch and Paul Ehrlich.
The synthetic dyes are classified as acid dyes, or basic dyes, depending on whether the molecule is a cation or an anion. The introduction of the terms acidic and basic was unfortunate because it would be more revealing to refer to them as cationic or anionic dyes. A look at the structural formula reveals the nature of the dye.

Each dye molecule has at least two functional chemical groupings. The auxochrome ionizes and gives the molecule the ability to react with the substrate, while the unsaturated chromophore absorbs specific wavelengths of light. The color of the solution obtained is that of the unabsorbed (transmitted) light. To be a dye, the molecule must have both auxochrome and chromophore groups. The auxochrome is usually an ionized carboxyl, hydroxyl, or pentavalent nitrogen group. The chromophore may have unsaturated nitrogen bonds such as azo (-N=N-) indamine (-N=), nitroso (-N=O) or nitro (O-N=O), groups; or unsaturated carbon to carbon, carbon to oxygen, or carbon to sulfur bonds, such as ethenyl (C=C), carbonyl (C=O), C=S, or the quinoid ring (= = =).
Resonance is also important to color. In crystal violet, an electron resonates between the three benzene rings. As the pH of the solution is lowered, the resonance becomes more and more restricted. When the resonance is restricted from three to only two benzene rings, the solution turns from violet to green, and then to red when resonance between the two rings ceases.
Cationic dyes will react with substrate groups that ionize to produce a negative charge, such as carboxyl, phenolic, or sulfhydryl groups. Anionic dyes will react with substrate groups which ionize to produce positive charges, such as the ammonium ion. Any substrate with such ionized groups should have an ability to combine with cationic or anionic dyes. Generally, the most important staining substrates in bacterial cells are proteins, especially the cytoplasmic proteins; however, other substances also have dye affinity. These include amino sugars, organic acids, nucleic acids, and certain polysaccharides.
Sudan III, or sudan black B, is a popular stain for fatty material. It does not have an auxochrome group, and is insoluble in water, but soluble in fatty material. When a solution of sudan black B in ethylene glycol is placed over bacterial cells, the fatty material will dissolve some of the dye and thus take on the color of the sudan black. The staining effect is purely a solubility phenomenon, and not a chemical reaction, or physical adsorption.
There are many stains that can reveal the morphology of the cell, and some simple stains, such as methylene blue, are quite good for viewing bacteria. The Gram stain is especially useful because it not only reveals bacterial morphology, but also is a differential stain. A differential stain differentiates organisms. (A differential stain shows a visible difference between different groups of organisms based on some characteristic they do not share, even though the procedure to stain the different looking organisms is the same). The Gram stain relies on cell wall differences between groups of bacteria.
The Gram staining procedure as it is done today, involves: a) primary staining of all cells with crystal violet, b) precipitating the primary stain dye within the cells with iodine (a mordant), c) removing the dye-iodine precipitate from some cells (the Gram-negative) with a decolorizer such as 95% ethanol, acetone, or n-propyl alcohol, and d) counter-staining of the decolorized cells with safranin. Organisms that retain the crystal violet primary dye are termed Gram-positive, while those which lose the primary stain and show the red safranin counter-stain are termed Gram-negative. This differentiation is not absolute, because it is based on the differences in the rate at which the primary dye is lost from the cells. If you over decolorize for too long or with too harsh a decolorizer, Gram-positive organisms will appear Gram-negative. Truly Gram-positive cells, such as Bacillus subtilis or Staphylococcus aureus, will not retain the primary dye if the iodine step is omitted. Criteria for a true Gram-positive state include the requirement of iodine following the crystal violet.
Since the term Gram positive or Gram negative actually refers to a type of cell wall, not all organisms that retain the primary dye of the Gram procedure are really Gram-positive, because they lack that particular cell wall composition. For example, Mycobacterium species have a different type of cell wall but they will take up and retain crystal violet if you use heat. In this case, the crystal violet will be resistant to harsh decolorization and be retained. However, a Mycobacterium type cell wall does not require the use of a mordant, like iodine, to precipitate the stain. True Gram-positive organisms do not retain the primary crystal violet without precipitation by a mordant. Using crystal violet with heat, harsh decolorization, and no mordant describes an acid-fast stain rather than a Gram stain. Mycobacteria have an acid-fast type cell wall; they are neither Gram-positive or Gram-negative, despite the fact that they will appear purple if you do a Gram-stain on them.

Activity: Preparing a Gram Stain
The Gram stain is a standard staining technique useful for the identification of culturable bacterial organisms and you will perform it now.
Use the slide prepared in Activity 2 and follow the Gram Stain Protocol found below and in BISC209/S11: Stains in the protocol section of this wiki.
Gram Stain Procedure:
To Gram stain the bacterial smear slides, perform the staining protocol from start to finish on one slide at a time. You must be careful to apply the staining reagents liberally so all the smears are evenly and completely covered and you must be sure to expose each smear to each reagent for the same amount of time.
1. Place your heatfixed bacterial smear slide on the staining tray. It is important that the slide be level during staining so use paper towels under the tray to get it leveled. If you do, it is much easier to be sure that your smears will be covered evenly with each reagent.
2. Dispense just enough Crystal Violet solution (0.5% crystal violet, 12% ethanol, 0.1% phenol) to completely cover each smear and stain for 1 minute. (Crystal violet is the primary stain.)
3. Rinse the slide by lifting the slide at a 45 degree angle (using gloves or a clothes pin or slide holder) and use a squirt bottle to direct a very gentle stream of water slightly above the top smear. Rinse until the waste water coming off at the bottom is relatively clear. Drain off excess water by touching the edge of the slide to a paper towel.
4. Dispense just enough Gram's Iodine (mordant)to completely cover each smear. Let stand for 1 minute. Rinse thoroughly with a gentle stream of water as in Step 1.
5. Lift the slide at a 45 degree angle and drip Decolorizing Reagent (80% isopropyl alcohol, 20% acetone) down the length of the slide making sure the decolorizer comes in contact with all three smears. This step is tricky as it is easy to over- or under-decolorize. Do this for 10 seconds and IMMEDIATELY rinse, as in step 3, with a gentle stream of water.
6. Place the slide flat on the staining tray and dispense just enough Counterstain (0.6% safranin in 20% ethanol) to cover each smear. Let stand for 2 minutes; rinse with water as in step 3.
7. Blot dry using the bibulous paper package found in your orange drawer. Do not tear out the pages, just insert your slide and pat it dry.
8. Clean up your area; rinse your staining tray in the sink and leave it to drain upside down on paper towels.
Use of the Compound Light Microscope
Activity: View your stained bacteria.
Refer to the directions for using your compound brightfield microscope BISC209/S11:_Microscopy found in the Protocols section. Today you will use only the 10x and 100x objectives. Remember also to read and follow the directions for care of this precision instrument (particularly on how to avoid getting immersion oil on any objective other than the 100x oil immersion lens). Be aware that there would be no field of microbiology if there weren't good, functioning microscopes to view this unseen world.
Gram Stain Results by use of Selective Media
Activity: Performing a Spot Inoculation Technique on Selective/Differential Media to Assess Gram Characteristics
You will inoculate each of your isolates onto both eosin methylene blue (EMB) and phenylethyl alcohol (PEA) media. Consult Culture Media: Use of Selective & Differential media to confirm Gram stain to learn how these media are able to select for either Gram positive or Gram negative bacteria and, in the case of EMB, to differentiate lactose fermenting bacteria from non-lactose fermenters. You should test all your isolates on both media to confirm your Gram stain results. You will be expected to know how these media select and differentiate for cell wall characteristics and/or metabolic differences.
PROTOCOL:
Use a marker to divide the bottom of 2 plates of each medium into 4 sections and organize a labeling system in your lab notebook and on the plate so you can easily identify where you placed each of your soil isolates: 2 isolates and a positive and negative control on one plate of each medium and another plate of each medium can be used for rest of your isolates with or without controls. (Use E. coli and Staph as controls.) You will spot inoculate the middle of each quadrant by taking a tiny amount of growth and inoculating a single thin zig-zag line in the center of a section. Incubate your plates at room temp for several days until you are sure that any inhibition of growth is from selection and not from slow growing bacteria. Put the plates in the refrigerator before they get overgrown. You can analyze them carefully in Lab 7. See the illustration below of a plate testing 4 samples.

Fig: 5C-1. Testing of multiple isolates in one plate can be accomplished by dividing a plate into 4 (OR MORE) sections. Be sure the inoculum is placed in the center of each section and that you check the plate for growth regularly.
Cultured Bacterial Isolate Characterization by Metabolic and Physical Tests
Testing for Antibiotic Production
Start the Testing for Antibiotic Production.
Many microbes secrete antimicrobial compounds to help them compete with other microorganisms for habitat. Common antibiotic producers are the Actinomycetes (including Streptomycetes species)and many of the Bacillus species; although they are just a few among many, many antibiotic producing bacteria.
(This testing will take 3 weeks.)
Week 1:
Since the soil is the main source of microbes that supply the world's antibiotics, it's possible that you might discover the next great antimicrobial drug soon and get very rich by selling the patent for your discovery to a drug company. (Remember that the discovery of penicillin was completely accidental.) In order to find out if any of your isolates are potential antibiotic producers, we will grow your isolates for 1 week on NA before we add the control bacteria or other isolates that may be sensitive to the antibiotic produced and secreted into the medium. You should test all of your isolates, IF they will grow on NA (not the Hyphomycrobia). Be espectially sure to test any isolates that grew on glycerol yeast extract media, because they are likely to be spore formers. Endospore formers are often antibiotic producers.
-
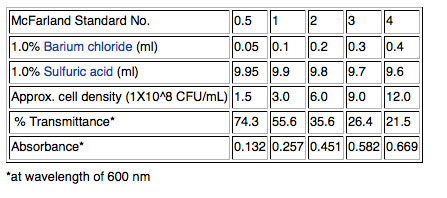
Use a fresh broth culture of each of your isolates. Pipet one ml into a small glass tube and use adjust the concentration of the cells by matching by eye the "cloudiness" (turbidity) of the cells in the small glass tube to a standard provided by your instructor. Add bacteria from a colony of the same isolate grown on solid medium to concentrate the cells in your tube if your culture seems too dilute or add more sterile Nutrient broth to dilute the culture aliquot if it is already cloudier than the standard. The ending volume is irrelevant. Vortex to mix. We will use a McFarland 0.5 standard provided. (Remember that cell concentration can be measured as optical density at 600nm in a spectrophotometer. ) The 0.5 refers to the approximate concentration of organisms in solutions; the 0.5 indicates a concentration of 1.5X10⁸ cfu/mL. Other common standards are shown in the table.
- Using a sterile swab, dip the swab in the concentration adjusted culture tube and make an inoculation (as shown below) down the middle of a plate of nutrient agar.
- Make a plate exactly like the first for each isolate to be tested. Label them carefully and incubate the plates for ~1 week at RT.


CLEAN UP
1. All culture plates that you are finished with should be discarded in the big orange autoclave bag near the sink next to the instructor table. Ask your instructor whether or not to save stock cultures and plates with organisms that are provided.
2. Culture plates, stocks, etc. that you are not finished with should be labeled on a piece of your your team color tape. Place the labeled cultures in your lab section's designated area in the incubator, the walk-in cold room, or at room temp. in a labeled rack. If you have a stack of plates, wrap a piece of your team color tape around the whole stack.
3. Remove tape from all liquid cultures in glass tubes. Then place the glass tubes with caps in racks by the sink near the instructor's table. Do not discard the contents of the tubes.
4. Glass slides or disposable glass tubes can be discarded in the glass disposal box.
5. Make sure all contaminated, plastic, disposable, serologic pipets and used contaminated micropipet tips are in the small orange autoclave bag sitting in the plastic container on your bench.
6. If you used the microscope, clean the lenses of the microscope with lens paper, being very careful NOT to get oil residue on any of the objectives other than the oil immersion 100x objective. Move the lowest power objective into the locked viewing position, turn off the light source, wind the power cord, and cover the microscope with its dust cover before replacing the microscope in the cabinet.
7. If you used it, rinse your staining tray and leave it upside down on paper towels next to your sink.
8. Turn off the gas and remove the tube from the nozzle. Place your bunsen burner and tube in your large drawer.
9. Place all your equipment (loop, striker, sharpie, etc) including your microfuge rack, your micropipets and your micropipet tips in your small or large drawer.
10. Move your notebook and lab manual so that you can disinfect your bench thoroughly.
11. Take off your lab coat and store it in the blue cabinet with your microscope.
12. Wash your hands.
Assignment
1 to 3 days(depending on how fast your organisms grow) prior to Lab 7, please inoculate EACH of your isolates into 2 tubes of sterile nutrient broth. (You can omit any isolates that won't grow on NA.)
On the same day you make the broths, subculture by isolation streaking EACH of your isolates onto nutrient agar or onto PyC medium (if your isolate won't grow on NA). In Lab 7 these cultures will be used by your team for the interaction assay, quorum sensing assay and tests for nitrogen cycle role.
Write a summary of the theory behind the following methods that we used to identify our bacteria by molecular tools:
genomic DNA isolation;
polymerase chain amplification of part of the 16s rRNA genes;
use of the Zero Blunt® TOPO® PCR Cloning Kit to create a library of unique plasmid vector with our 16S rRNA gene inserts;
transformation of One Shot® TOP10 Competent E. coli cells with our vector plasmid that allowed us to select, separate, and amplify our 16S rRNA genes;
DNA sequencing by the newer fluorescent-labeled ddNPTs chain -termination (Sanger) method.
Directions for this assignment found at: Lab 6 Assignment: Assignment: Theory Summary
Links to Labs
Lab 1
Lab 2
Lab 3
Lab 4
Lab 5
Lab 6
Lab 7
Lab 8
Lab 9
Lab 10
Lab11
Lab 12