BISC209/S13: Lab8: Difference between revisions
No edit summary |
|||
| (28 intermediate revisions by the same user not shown) | |||
| Line 4: | Line 4: | ||
== | ==Complete Antibiotic Production & Sensitivity Testing== | ||
<UL><LI> | <UL><LI> | ||
Examine the Antibiotic plates and look for evidence of a zone of inhibition (no growth or reduced growth) of any of the "control" organisms in an area near the putative antibiotic producer's colonial growth. Evidence of antibiotic production should appear as a measurable zone of inhibition (section of a circle of no growth or reduced growth compared to the growth seen on the control plate). The size of the zone of inhibition is indicative of the diffusion potential of the antibiotic and/or an indication of how sensitive the test organism is to the secreted inhibitor. Compare your results to other tested isolates in your lab section. Think about why an antibiotic might work differently on a Gram positive vs. a Gram negative organism or between two bacteria that are both Gram positive or Gram negative. <LI> | '''Examine the Antibiotic plates''' and look for evidence of a zone of inhibition (no growth or reduced growth) of any of the "control" organisms in an area near the putative antibiotic producer's colonial growth. Evidence of antibiotic production should appear as a measurable zone of inhibition (section of a circle of no growth or reduced growth compared to the growth seen on the control plate). The size of the zone of inhibition is indicative of the diffusion potential of the antibiotic and/or an indication of how sensitive the test organism is to the secreted inhibitor. Compare your results to other tested isolates in your lab section. Think about why an antibiotic might work differently on a Gram positive vs. a Gram negative organism or between two bacteria that are both Gram positive or Gram negative. <LI> | ||
==Finding Evidence for Co-operation and Competition Among Cultured Members of a Soil Community== | ==Finding Evidence for Co-operation and Competition Among Cultured Members of a Soil Community== | ||
| Line 21: | Line 17: | ||
Observe the colonies on your plate, comparing any differences in the appearance of the colony growth of each isolate, alone vs mixed. Look first at each control culture: the inoculum in each of the diagonal spots is a pure culture control as are the spots in the column on the far left. Compare each "spot" where two isolates are mixed to the control spots where each isolate is growing alone. Is either isolate growing better in combination than alone? If so, you have found a mutualistic (beneficial) interaction. For example, in the assay shown above, isolate #102 appears to have a positive effect on the growth of #101, classified as mutualism. Are there combinations that show a reduction in the amount of growth of either isolate compared to the growth of the control areas? If so, you have found an antagonistic (negative) interaction. An example in the assay plate shown above is between isolates #105 and #102. Number 105 seems to inhibit growth of #102, an example of an antagonistic interaction. Note that there are sometimes "edge" effects, differences in the appearance of the colony growth in the cultures along the perimeter of the plate as opposed to those growing in a more protected locations (such as the diagonal control colonies). Spend some time with these plates, carefully and fully evaluating all possible combinations of your soil community isolates for as many as possible examples of mutualism or antagonism. Record your results in your lab notebook with copies of the photos of your plates. <br><BR> | Observe the colonies on your plate, comparing any differences in the appearance of the colony growth of each isolate, alone vs mixed. Look first at each control culture: the inoculum in each of the diagonal spots is a pure culture control as are the spots in the column on the far left. Compare each "spot" where two isolates are mixed to the control spots where each isolate is growing alone. Is either isolate growing better in combination than alone? If so, you have found a mutualistic (beneficial) interaction. For example, in the assay shown above, isolate #102 appears to have a positive effect on the growth of #101, classified as mutualism. Are there combinations that show a reduction in the amount of growth of either isolate compared to the growth of the control areas? If so, you have found an antagonistic (negative) interaction. An example in the assay plate shown above is between isolates #105 and #102. Number 105 seems to inhibit growth of #102, an example of an antagonistic interaction. Note that there are sometimes "edge" effects, differences in the appearance of the colony growth in the cultures along the perimeter of the plate as opposed to those growing in a more protected locations (such as the diagonal control colonies). Spend some time with these plates, carefully and fully evaluating all possible combinations of your soil community isolates for as many as possible examples of mutualism or antagonism. Record your results in your lab notebook with copies of the photos of your plates. <br><BR> | ||
==Sharing examples== | |||
If you have positive antibiotic producers or AI producers, or cool interactions please show them to your lab instructor so they can be shared with the class and saved. <R> | |||
Take photos of any plates that show evidence of the presence of antibiotic producers in your soil community. If you found that your isolates did not appear to cause measurable inhibition of growth, does that mean that your isolate does not secrete any antimicrobial compounds? Explain? </LI></UL><BR><BR> | |||
==Assessing Bacterial Morphology: morphological features visualized by special staining techniques== | ==Assessing Bacterial Morphology: morphological features visualized by special staining techniques== | ||
Today you will make smear slides (Protocols as Smear Slide Preparation [[BISC209/S13: Smear slide| Smear Slide Preparation]]) to perform a few special stains to look for spores, capsules, or flagella ([[BISC209/S13: Stains | Stains: Gram Stain]]) and to repeat Gram stains (but only if you got ambiguous results on your Gram stains in | Today you will make smear slides (Protocols as Smear Slide Preparation [[BISC209/S13: Smear slide| Smear Slide Preparation]]) to perform a few special stains to look for spores, capsules, or flagella ([[BISC209/S13: Stains | Stains: Gram Stain]]) and to repeat Gram stains (but only if you got ambiguous results on your Gram stains).<BR><BR> | ||
==Assessing isolates for Cellulose, Starch and Phosphate solubilizing enzymes == | |||
'''Exoenzyme test media (also refer to Lab 3 assessing community exoenzymes):'''<BR><BR> | |||
'''Starch medium to assess the presence of amylase in isolates:''' | |||
2.5%(wt/vol) soluble starch in Nutrient Agar (0.3% Beef extract, 0.5% Peptone, 1.5% Agar; Deionized water to 1 L at pH 6.6- 7.0 at 25°C) | |||
'''Cellulose Congo Red Agar to assess the presence of cellulase in isolates: '''<BR> | |||
0.05% K2HPO4; 0.025% MgSo4; 0.188% ashed, acid washed cellulose powder; 0.02% Congo red, 1.0% Noble Agar, 0.2% gelatin, 10%(vol/vol) sterile soil extract(10.5% air-dried, sieved soil that's autoclaved twice, allowed to settle, and the supernatant filtered); final pH 7.0 - 8.0. <BR> | |||
Reference: Hendricks, C.W., Doyle, J.D., Hugley, B. (1995) A new solid medium for enumerating cellulose-utilizing bacteria in soil. Applied and Environmental Microbiology ''61'', 2016-2010. <BR><BR> | |||
'''Phosphate Medium (Pidovskaya medium [PVK]) is used to assess the ability of isolates to solubilize phosphatases:''' <BR> | |||
'''Pidovskaya Medium Modified (Nautiyal, 1999)''' 1% glucose; 0.5% Calcium Phosphate [Ca<sub>3</sub>(PO<sub>4</sub>)<sub>2</sub>; 1% MgCl<sub>2</sub>.6H<sub>2</sub>O; 0.25% Magnesium Sulfate (MgSO<sub>4</sub>.7H20);0.2% (NH4)2SO4; 0.25% KCL; 0.0025% BromoPhenol Blue; 1.5-2% agar <BR> | |||
References: Pikovskaya, R.I. 1948. Mobilization of phosphorus in soil in connection with the vital activity of some microbial species. Microbiologia ''17'', 362-370> <BR> | |||
Pranjal Baruah (2007)Isolation of phosphate solubilizing bacteria from soil and its activity. Available at: Biotechindia.files.wordpress.com/2007/12/isolation.pdf.<BR><BR> | |||
'''Protocol:'''<BR> | |||
'''Activity: Performing a '''Spot''' Inoculation Technique '''<BR> | |||
You will inoculate each of your isolates onto all media, placing 4 isolates in a different quadrant of each plate. <BR><BR> | |||
Use a marker to divide the bottom of each plate for each medium into 4 sections and organize a labeling system in your lab notebook and on the plate so you can easily identify where you placed each of your soil isolates: You will spot inoculate the middle of each quadrant by taking a tiny amount of growth on your inoculating needle and inoculating a single spot in the center of a section. Incubate your plates at room temp for several days until you are sure that any inhibition of growth is from selection and not from slow growing bacteria. Put the plates in the refrigerator before they get overgrown. You can analyze them in the next lab. See the illustration below of how to inoculate a plate with 4 different cultures. <BR> | |||
[[Image: Quadrant_plate2.jpg]]<BR> | |||
'''Fig: 8-1.''' Testing of multiple isolates in one plate can be accomplished by dividing a plate into 4 sections. Be sure the inoculum is placed in the center of each section and that you check the plate for growth regularly. <BR><BR> | |||
==Analysis== | |||
'''Cellulose medium:''' The red color of the medium provides increased contrast between the cellulose containing medium and the halo or clear zone that indicates that cellulase has diffused out of bacterial producers and degraded the cellulose in the immediate vicinity. | |||
'''PVK medium:''' Look for a clear zone around the inoculum indicating the phosphate in the medium was solubilized and processed by enzymes secreted from the bacteria. | |||
'''Starch Medium''': Flood the plate with Grams Iodine. Let the plate sit for at least 10 minutes, longer is fine. The plate should turn dark blue as the iodine binds to the starch. Pour off the excess iodine (into paper towels in the biohazard bag on your bench) and wait until the remaining liquid is absorbed by the plate. Look for the presence of a clear halo around the inoculum site indicating the presence of amylase. | |||
=='''Special Stains:'''== | =='''Special Stains:'''== | ||
| Line 35: | Line 67: | ||
'''Confirmatory Tests for Motility'''<BR> | '''Confirmatory Tests for Motility'''<BR> | ||
Directions for the Hanging Drop motility test and Flagella stain can be found in the Motility section of Protocols. All bacteria that were positive or ambiguous for motility in NMN medium should be looked at by Hanging Drop technique. Any "swarmers" (bacteria that spread all over the plate when cultured on solid medium)should be looked at by Hanging Drop, too. If the hanging drop test is positive and you have time after you have performed any other confirmation tests or special stains, you could try the Flagella stain, but don't worry if you don't have time for this stain. It is VERY difficult to see flagella even when they are coated with several layers of stain reagent that make the diameter larger. It is hard to get this stain to work well. <BR><BR> | Directions for the Hanging Drop motility test and Flagella stain can be found in the Motility section of Protocols. All bacteria that were positive or ambiguous for motility in NMN medium should be looked at by Hanging Drop technique. Any "swarmers" (bacteria that spread all over the plate when cultured on solid medium)should be looked at by Hanging Drop, too. If the hanging drop test is positive and you have time after you have performed any other confirmation tests or special stains, you could try the Flagella stain, but don't worry if you don't have time for this stain. It is VERY difficult to see flagella even when they are coated with several layers of stain reagent that make the diameter larger. It is hard to get this stain to work well. In 2013 we will not perform this stain. <BR><BR> | ||
'''Detecting Capsules by Negative Stain'''<BR> | '''Detecting Capsules by Negative Stain'''<BR> | ||
| Line 42: | Line 74: | ||
'''Repeating Gram Stains''' <BR> | '''Repeating Gram Stains''' <BR> | ||
If your Gram stain results were ambiguous or not what you expected from the growth patterns you observed on PEA and EMB media, you should probably repeat those Gram stains. If there are any PEA and EMB plates, consider rechecking the growth of your cultures on these media. Perhaps your earlier cultures were not pure? How did your stains look? Is it possible there were more than one organism in what you thought were pure cultures? If so, what effect might this have on your genomic data? What other implications might there be? | If your Gram stain results were ambiguous or not what you expected from the growth patterns you observed on PEA and EMB media, you should probably repeat those Gram stains. If there are any PEA and EMB plates, consider rechecking the growth of your cultures on these media. Perhaps your earlier cultures were not pure? How did your stains look? Is it possible there were more than one organism in what you thought were pure cultures? If so, what effect might this have on your genomic data? What other implications might there be? | ||
==Freezing Pure Culture Isolates== | |||
If there is time today you can begin FREEZING your “PURE” bacterial CULTURES FROM STOCKS | |||
<UL><LI>microfuge tubes | |||
<LI>1000µL Pipetman | |||
<LI>microfuge tube labels | |||
<LI>sterile 20% glycerol stock | |||
<LI>sterile toothpicks | |||
<LI>young culture (~24 hr) of student pure isolates grown on plates | |||
<LI>Google Doc or Excel Spreadsheet for Strain Database</LI></UL> | |||
<BR> | |||
Remember that your frozen stocks are potentially the one and only source you have for that bacterial species. Therefore be especially careful with your sterile technique when creating and working with your stocks, and make sure you are vigilant about keeping your strain list up-to-date and correct<BR> | |||
Wear gloves to avoid contamination and work near flame (watch your hair and hands!)<BR> | |||
Thoroughly wash your hands and decontaminate the bench before beginning<BR> | |||
Make sure not to place tube cap on any surface (to keep it sterile)<BR> | |||
'''Create a strain database file''' | |||
# Give each isolate a strain name: '''your initials followed by a number''' | |||
# Use the 209 lab Google Doc spreadsheet and fill in all the information listed below<BR> | |||
<UL><UL><UL> | |||
<LI> Strain name. (please check with your instructor: use '''B209-2013-and your ID code from sequencing''' | |||
<LI> Bacterial species (if known) | |||
<LI> The source of the bacterial strain (which greenhouse environment). | |||
<LI>Information about where in your notebook you first discuss this strain. | |||
<LI>The date the stock culture used for freezing was made. | |||
</UL></UL></UL> | |||
'''Making the Cell Stock''' <BR> | |||
1. Label the side of the cryo-tube with the cell strain name (and any additional info you want) <BR> | |||
2. Add scotch tape over the label to ensure it doesn’t rub off <BR> | |||
3. If the cryo-tube has a place to put a top label on, prepare that also <BR> | |||
NOTE: The cryo-tubes typically do not fit into the standard eppendorf racks; a good alternative is to use the styrofoam base that 15 ml conicals come in—those openings are large enough for the cryo-tubes to rest securely in but not so deep you cannot remove and replace the cap easily<BR> | |||
4. Screw open the tube but leave the cap sitting loosely on top <BR> | |||
5. Add 800 ul of 20% glycerol in Nutrient Agar to the cryo-tube using P1000 pipette (be careful to not set cap down or let it touch any surface)<BR> | |||
6. Scrape up cells from the plate with a flat toothpick—try not to gouge agar, just remove cells<BR> | |||
7. Open cap and swirl toothpick in the media/glycerol to remove cells<BR> | |||
8. Place 2 – 3 good-sized scrapings into the glycerol media <BR> | |||
9. Pipette gently with P1000 to break up chunks of cells and disperse them<BR> | |||
10. Mixture should be opaque—if not, add more cells<BR> | |||
11. Place in labeled freezer box so your instructor can put the box in -80 degree freezer <BR> | |||
Be sure to label both the lid and the tube of a glycerol stock before you place the sample at -80°C. Frozen tubes are hard to write on and samples stored for long periods at -80°C can lose labels stuck to tube! | |||
'''Tips and FAQ'''<BR> | |||
The optimal concentration of long-term glycerol storage is unknown. Most labs store bacteria in 15-25% glycerol.<BR> | |||
Try not to freeze/thaw your glycerol stock too many times. If you need to thaw frequently than make a new glycerol stock replacement from a freshly grown culture.<BR> | |||
==Assignment== | ==Assignment== | ||
Graded Assignment: | '''Graded Assignment''': Table of Isolate tests: Design and Analysis and Figures of antibiotic and interactions assay. | ||
<BR> | |||
Consult the full details for this assignment found at: [[BISC209/S13: Assignment 209 Lab8]]<BR> | |||
'''To do before next lab''': | '''To do before next lab''': | ||
In lab 9 you will need freshly grown (log phase) cultures of your isolates for species level identification using Matrix-assisted laser desorption/ionization time of flight mass spectrometry (MALDI-TOF MS). Your instructor will provide more information about this technique, but it is very important that your isolates are in log phase growth prior to using the MALDI-TOF. <br> If you have any remaining isolates to freeze for potential future investigations you will be able to use this same young culture. If you have one or two very slow growing cultures, you need to allow enough time to have a small visible colony on your plate. | |||
<div class=noprint> | <div class=noprint> | ||
| Line 65: | Line 162: | ||
[[BISC209/S13: Lab9 | Lab 9 ]]<br> | [[BISC209/S13: Lab9 | Lab 9 ]]<br> | ||
[[BISC209/S13: Lab10 | Lab 10 ]]<br> | [[BISC209/S13: Lab10 | Lab 10 ]]<br> | ||
[[BISC209/S13: Lab11 | Lab 11]]<BR> | |||
</div> | </div> | ||
Latest revision as of 07:37, 4 April 2013

Complete Antibiotic Production & Sensitivity Testing
- Examine the Antibiotic plates and look for evidence of a zone of inhibition (no growth or reduced growth) of any of the "control" organisms in an area near the putative antibiotic producer's colonial growth. Evidence of antibiotic production should appear as a measurable zone of inhibition (section of a circle of no growth or reduced growth compared to the growth seen on the control plate). The size of the zone of inhibition is indicative of the diffusion potential of the antibiotic and/or an indication of how sensitive the test organism is to the secreted inhibitor. Compare your results to other tested isolates in your lab section. Think about why an antibiotic might work differently on a Gram positive vs. a Gram negative organism or between two bacteria that are both Gram positive or Gram negative.
-
Finding Evidence for Co-operation and Competition Among Cultured Members of a Soil Community
Complete the Interaction Assays
If you haven't been provided with a digital image, please take a photo of each of your interaction plates. Make sure that the photos are sharp enough to evaluate later. Download them to your dropbox in Sakai. Email them to yourself and to each of your partners.
A sample completed assay is shown below.
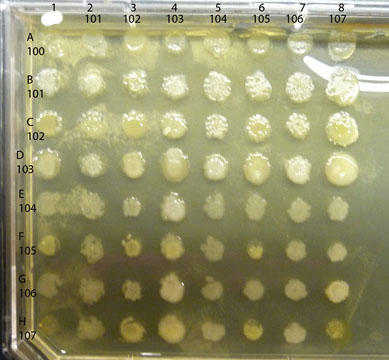
Observe the colonies on your plate, comparing any differences in the appearance of the colony growth of each isolate, alone vs mixed. Look first at each control culture: the inoculum in each of the diagonal spots is a pure culture control as are the spots in the column on the far left. Compare each "spot" where two isolates are mixed to the control spots where each isolate is growing alone. Is either isolate growing better in combination than alone? If so, you have found a mutualistic (beneficial) interaction. For example, in the assay shown above, isolate #102 appears to have a positive effect on the growth of #101, classified as mutualism. Are there combinations that show a reduction in the amount of growth of either isolate compared to the growth of the control areas? If so, you have found an antagonistic (negative) interaction. An example in the assay plate shown above is between isolates #105 and #102. Number 105 seems to inhibit growth of #102, an example of an antagonistic interaction. Note that there are sometimes "edge" effects, differences in the appearance of the colony growth in the cultures along the perimeter of the plate as opposed to those growing in a more protected locations (such as the diagonal control colonies). Spend some time with these plates, carefully and fully evaluating all possible combinations of your soil community isolates for as many as possible examples of mutualism or antagonism. Record your results in your lab notebook with copies of the photos of your plates.
Sharing examples
If you have positive antibiotic producers or AI producers, or cool interactions please show them to your lab instructor so they can be shared with the class and saved. <R>
Take photos of any plates that show evidence of the presence of antibiotic producers in your soil community. If you found that your isolates did not appear to cause measurable inhibition of growth, does that mean that your isolate does not secrete any antimicrobial compounds? Explain?

Assessing Bacterial Morphology: morphological features visualized by special staining techniques
Today you will make smear slides (Protocols as Smear Slide Preparation Smear Slide Preparation) to perform a few special stains to look for spores, capsules, or flagella ( Stains: Gram Stain) and to repeat Gram stains (but only if you got ambiguous results on your Gram stains).
Assessing isolates for Cellulose, Starch and Phosphate solubilizing enzymes
Exoenzyme test media (also refer to Lab 3 assessing community exoenzymes):
Starch medium to assess the presence of amylase in isolates: 2.5%(wt/vol) soluble starch in Nutrient Agar (0.3% Beef extract, 0.5% Peptone, 1.5% Agar; Deionized water to 1 L at pH 6.6- 7.0 at 25°C)
Cellulose Congo Red Agar to assess the presence of cellulase in isolates:
0.05% K2HPO4; 0.025% MgSo4; 0.188% ashed, acid washed cellulose powder; 0.02% Congo red, 1.0% Noble Agar, 0.2% gelatin, 10%(vol/vol) sterile soil extract(10.5% air-dried, sieved soil that's autoclaved twice, allowed to settle, and the supernatant filtered); final pH 7.0 - 8.0.
Reference: Hendricks, C.W., Doyle, J.D., Hugley, B. (1995) A new solid medium for enumerating cellulose-utilizing bacteria in soil. Applied and Environmental Microbiology 61, 2016-2010.
Phosphate Medium (Pidovskaya medium [PVK]) is used to assess the ability of isolates to solubilize phosphatases:
Pidovskaya Medium Modified (Nautiyal, 1999) 1% glucose; 0.5% Calcium Phosphate [Ca3(PO4)2; 1% MgCl2.6H2O; 0.25% Magnesium Sulfate (MgSO4.7H20);0.2% (NH4)2SO4; 0.25% KCL; 0.0025% BromoPhenol Blue; 1.5-2% agar
References: Pikovskaya, R.I. 1948. Mobilization of phosphorus in soil in connection with the vital activity of some microbial species. Microbiologia 17, 362-370>
Pranjal Baruah (2007)Isolation of phosphate solubilizing bacteria from soil and its activity. Available at: Biotechindia.files.wordpress.com/2007/12/isolation.pdf.
Protocol:
Activity: Performing a Spot Inoculation Technique
You will inoculate each of your isolates onto all media, placing 4 isolates in a different quadrant of each plate.
Use a marker to divide the bottom of each plate for each medium into 4 sections and organize a labeling system in your lab notebook and on the plate so you can easily identify where you placed each of your soil isolates: You will spot inoculate the middle of each quadrant by taking a tiny amount of growth on your inoculating needle and inoculating a single spot in the center of a section. Incubate your plates at room temp for several days until you are sure that any inhibition of growth is from selection and not from slow growing bacteria. Put the plates in the refrigerator before they get overgrown. You can analyze them in the next lab. See the illustration below of how to inoculate a plate with 4 different cultures.

Fig: 8-1. Testing of multiple isolates in one plate can be accomplished by dividing a plate into 4 sections. Be sure the inoculum is placed in the center of each section and that you check the plate for growth regularly.
Analysis
Cellulose medium: The red color of the medium provides increased contrast between the cellulose containing medium and the halo or clear zone that indicates that cellulase has diffused out of bacterial producers and degraded the cellulose in the immediate vicinity.
PVK medium: Look for a clear zone around the inoculum indicating the phosphate in the medium was solubilized and processed by enzymes secreted from the bacteria.
Starch Medium: Flood the plate with Grams Iodine. Let the plate sit for at least 10 minutes, longer is fine. The plate should turn dark blue as the iodine binds to the starch. Pour off the excess iodine (into paper towels in the biohazard bag on your bench) and wait until the remaining liquid is absorbed by the plate. Look for the presence of a clear halo around the inoculum site indicating the presence of amylase.
Special Stains:
Directions for the Schaeffer-Fulton Endospore stain and Capsule negative stain are found in the Protocols section of the wiki.
Stains : Simple, Gram, Endospore, Capsule. The confirmatory tests for motility are found in Protocols under MOTILITY.
Detecting Endospores
All Gram positive bacilli or any bacteria that showed a spore shaped, unstained area in the cells when Gram stained should be stained for endospores. In addition, any Gram positive isolates growing from your dried soil extract on Glyerol Yeast Extract Agar (GYEA) medium should be stained for endospores. There is no need to stain Gram negative isolates for endospores. Would it surprise you to know that most of the spore forming bacteria are common soil organisms? Why would the capacity to form a highly protective, heat tolerant, dessication resistant, non-metabolic spore be useful to soil community microorganisms? Would this capacity give those members a competitive advantage to survive weather extremes? Would you expect a tropical greenhouse habitat to contain relatively fewer or more spore forming members than other habitats?
Confirmatory Tests for Motility
Directions for the Hanging Drop motility test and Flagella stain can be found in the Motility section of Protocols. All bacteria that were positive or ambiguous for motility in NMN medium should be looked at by Hanging Drop technique. Any "swarmers" (bacteria that spread all over the plate when cultured on solid medium)should be looked at by Hanging Drop, too. If the hanging drop test is positive and you have time after you have performed any other confirmation tests or special stains, you could try the Flagella stain, but don't worry if you don't have time for this stain. It is VERY difficult to see flagella even when they are coated with several layers of stain reagent that make the diameter larger. It is hard to get this stain to work well. In 2013 we will not perform this stain.
Detecting Capsules by Negative Stain
Highly mucoid (sticky and wet) colonies could be tested for the presence of a capsule using the capsule stain protocol if you have time. A capsule is a secreted, protective, adhesive, polysacchride envelope layer outside the other parts of the cell envelope. Some, but not all bacteria produce a capsule. It tends to be a virulence factor in bacteria that are human pathogens because it makes it more difficult for the immune system to recognize the bacterium with a capsule as a foreign invader. If you don't have time to perform this stain to check for the presence of a capsule, don't worry. This stain, like the flagella stain, is also difficult to get to work well. If you want to try it, the protocol is found in the Special Stains section of PROTOCOLS.
Repeating Gram Stains
If your Gram stain results were ambiguous or not what you expected from the growth patterns you observed on PEA and EMB media, you should probably repeat those Gram stains. If there are any PEA and EMB plates, consider rechecking the growth of your cultures on these media. Perhaps your earlier cultures were not pure? How did your stains look? Is it possible there were more than one organism in what you thought were pure cultures? If so, what effect might this have on your genomic data? What other implications might there be?
Freezing Pure Culture Isolates
If there is time today you can begin FREEZING your “PURE” bacterial CULTURES FROM STOCKS
- microfuge tubes
- 1000µL Pipetman
- microfuge tube labels
- sterile 20% glycerol stock
- sterile toothpicks
- young culture (~24 hr) of student pure isolates grown on plates
- Google Doc or Excel Spreadsheet for Strain Database
Remember that your frozen stocks are potentially the one and only source you have for that bacterial species. Therefore be especially careful with your sterile technique when creating and working with your stocks, and make sure you are vigilant about keeping your strain list up-to-date and correct
Wear gloves to avoid contamination and work near flame (watch your hair and hands!)
Thoroughly wash your hands and decontaminate the bench before beginning
Make sure not to place tube cap on any surface (to keep it sterile)
Create a strain database file
- Give each isolate a strain name: your initials followed by a number
- Use the 209 lab Google Doc spreadsheet and fill in all the information listed below
- Strain name. (please check with your instructor: use B209-2013-and your ID code from sequencing
- Bacterial species (if known)
- The source of the bacterial strain (which greenhouse environment).
- Information about where in your notebook you first discuss this strain.
- The date the stock culture used for freezing was made.
Making the Cell Stock
1. Label the side of the cryo-tube with the cell strain name (and any additional info you want)
2. Add scotch tape over the label to ensure it doesn’t rub off
3. If the cryo-tube has a place to put a top label on, prepare that also
NOTE: The cryo-tubes typically do not fit into the standard eppendorf racks; a good alternative is to use the styrofoam base that 15 ml conicals come in—those openings are large enough for the cryo-tubes to rest securely in but not so deep you cannot remove and replace the cap easily
4. Screw open the tube but leave the cap sitting loosely on top
5. Add 800 ul of 20% glycerol in Nutrient Agar to the cryo-tube using P1000 pipette (be careful to not set cap down or let it touch any surface)
6. Scrape up cells from the plate with a flat toothpick—try not to gouge agar, just remove cells
7. Open cap and swirl toothpick in the media/glycerol to remove cells
8. Place 2 – 3 good-sized scrapings into the glycerol media
9. Pipette gently with P1000 to break up chunks of cells and disperse them
10. Mixture should be opaque—if not, add more cells
11. Place in labeled freezer box so your instructor can put the box in -80 degree freezer
Be sure to label both the lid and the tube of a glycerol stock before you place the sample at -80°C. Frozen tubes are hard to write on and samples stored for long periods at -80°C can lose labels stuck to tube!
Tips and FAQ
The optimal concentration of long-term glycerol storage is unknown. Most labs store bacteria in 15-25% glycerol.
Try not to freeze/thaw your glycerol stock too many times. If you need to thaw frequently than make a new glycerol stock replacement from a freshly grown culture.
Assignment
Graded Assignment: Table of Isolate tests: Design and Analysis and Figures of antibiotic and interactions assay.
Consult the full details for this assignment found at: BISC209/S13: Assignment 209 Lab8
To do before next lab:
In lab 9 you will need freshly grown (log phase) cultures of your isolates for species level identification using Matrix-assisted laser desorption/ionization time of flight mass spectrometry (MALDI-TOF MS). Your instructor will provide more information about this technique, but it is very important that your isolates are in log phase growth prior to using the MALDI-TOF.
If you have any remaining isolates to freeze for potential future investigations you will be able to use this same young culture. If you have one or two very slow growing cultures, you need to allow enough time to have a small visible colony on your plate.