BISC209: Roles of soil Microbes: Difference between revisions
Tucker Crum (talk | contribs) |
Tucker Crum (talk | contribs) |
||
| Line 82: | Line 82: | ||
Pour a small amount of your broth culture of one of your isolates into a microfuge tube and use your P200 to transfer 50μL of culture from the microfuge tube to the reagent drop.<LI> | Pour a small amount of your broth culture of one of your isolates into a microfuge tube and use your P200 to transfer 50μL of culture from the microfuge tube to the reagent drop.<LI> | ||
Mix well with the pipet tip.<LI> | Mix well with the pipet tip.<LI> | ||
Use the color chart provided with the reagents to detect color change indicative of nitrate, nitrite or ammonia. Make sure you have a drop of control broth mixed with each reagent | Use the color chart provided with the reagents to detect color change indicative of nitrate, nitrite or ammonia. Make sure you have for comparison a drop of control broth (uninoculated with bacteria) mixed with each reagent on a separate or the same slide . <BR> | ||
<li> | <li> | ||
If you obtain a negative result, continue to incubate your | If you obtain a negative result, continue to incubate the peptone broth culture of your isolates and retest every few days until you are sure a negative result is a true negative. <LI> | ||
Record your findings in a table.<BR><BR> | Record your findings in a table.<BR><BR> | ||
Revision as of 10:35, 26 February 2010
Examining Roles of Soil Bacteria in an Ecosystem
The following tests allow you to examine some of the catabolic abilities of your bacterial isolates. It is unlikely that you will be able to test every isolate you have nursed along during the preceeding weeks with every one of these tests. Please select tests that can be used, if positive, as evidence for some suspected role you think the bacteria from a particular enrichment group might possess or that could be an unexpected, yet important, role for one of your isolate. Select isolates from the greatest variety of enrichment media.
Glucose catabolism - Fermentation Media
Screening for carbohydrate catabolism
Glucose is a simple sugar that can enter cells directly; therefore, it is the most common energy source and the one preferred. (Remember your BISC110 study of glucose repression: a common way to downregulate production of enyzmes that allow catabolism of other sugars like lactose.) Some bacteria can only catabolize glucose in the presence of oxygen (oxidative catabolism), while others can also (or only) ferment the glucose, breaking it down to acidic products in the presence and/or absence of oxygen. Based on the outcome of the OF-glucose test bacteria can be separated into distinct groups: strict aerobes (the oxidation of glucose) and facultative aerobes (an anaerobic process).
OF Glucose Medium is useful in screening for the ability of organisms to oxidize and/or ferment sugars. The medium is composed of a high concentration of glucose (carbohydrate) and a low concentration of peptone. The peptone supports the growth of bacteria unable to oxidize or ferment the carbohydrate. The medium is used as a semi-solid agar deep. ([Original paper]http://www.ncbi.nlm.nih.gov/pmc/articles/PMC357086/: Hugh, Rudolph and Einar Leifson. 1953. Journal of Bacteriology. 66(1): 24-26.)
OF Glucose medium recipe: peptone, 0.2 per cent; NaCl, 0.5 per cent; K2HPO4, 0.03 per cent; agar, 0.3 per cent; bromthymol blue, 0.003 per cent; carbohydrate, 1.0 per cent; pH 7.1.
OF-Glucose Test Procedure:
Observe and record the color and texture of the uninoculated OF Glucose deep tubes.
Label 2 tubes of OF Glucose broth medium for each organism tested: one screw cap and one cotton or loosely capped tube.
Using your best aseptic technique, inoculate part of an isolated colony in pure culture to the two broths.
Be sure to tightly seal the screw cap tube, (NOTE:a layer (5 mm) of mineral oil can be added to the surface of the medium to block oxygen diffusion).
Incubate the tubes.
Observe for:
Presence of growth (cloudy/not cloudy or flaky precipitate/no precipitate)
Color of medium: a change to yellow indicates acidic by-products of glucose catabolism; a change to dark blue indicates alkaline by-products due to the use of peptone, not glucose.
Type of metabolism: 1. oxidative-- where glucose is metabolized only in the open tube, plus or minus gas production)) or 2. fermentative-- where glucose is metabolized in both tubes.
Observing the location of growth in this medium can indicate motility, how?
Observe both tubes and compare to an uninoculated tube. A change in the color of the bromothymol blue indicator to yellow indicates the ability to ferment glucose. If both the loosely capped and screw cap tube are yellow, the organism is able to ferment the carbohydrate. The presence of an oxidative pathway only is indicated by yellow in the loosely capped tube but yellow color in the tightly capped tube. If the medium turns a blue color, the organism cannot oxidize or ferment the sugar in the tube, but it is able to use the peptone to produce an alkaline product.
If an isolate is able to ferment glucose in OF-glucose medium, try testing its ability to ferment different sugars using the protocol for Carbohydrate Fermentation Medium.
Cellulose degradation
Carbon is a basic component of organic molecules. Its availability for animals and plants is critical. Many soil bacteria are able to accomplish CO2 recycling of an abudant source, cellulose. Plants store large amounts of carbon as cellulose but cellulose is not easily broken down by plants or animals. Bacteria that have the enzyme cellulase play an crucial recycling role in breaking down such plant material into compost. They also make valuable by-products available for other microorganisms while, eventually, cycling the carbon for plants and animals to use again.
Materials:
Soil bacteria to test, grown in an appropriate broth culture, preferable in log phase;
Melted nutrient agar,
sterile petri dishes,
leaf or plant material discs, taken from the plants near the location of soil sampling in the Greenhouse,
Sterile swabs
Protocol: One plate for 2 bacteria to be tested
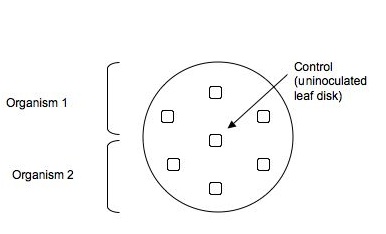
- Go down to the Greenhouse to your habitat under investigation. Put on gloves and collect 3 different plant's leaves (2-3 leaves per plant) from those around your soil sampling site. Choose mature, living leaves from inconspicuous places at the bottom of the plant. Put the leaves in a sandwich bag and return to the lab after you have recorded the name of the plants and their location. When back in the lab, wearing gloves and holding an autoclaved microfuge tube, open the lid of the microfuge tube and position it so that the tube is below the leaf and the top is above it. Punch out about 7 leaf discs from the variety of leaves you collected into this tube. Close the lid of the microfuge tube.
- Pour about 15ml of melted nutrient agar (or the appropriate melted agar medium for your bacteria to be tested) into a labeled dish. You can heat up a small flask of solid media in the microwave for about 20 seconds to get it pourable. (Make sure the flask has a cotton plug or small beaker over the opening so it doesn't boil over.)
-
As aseptically as possible (wear gloves and use the sharp end of a microfuge to "spear" a leaf disc from the microfuge tube to remove it. Then use the blunt end of another microfuge tip to push the leaf disc into the agar, pressing gently so that the leaf pieces are on the surface of the agar, but deep enough to be held in place once the agar hardens. Organize the disks so 2 organisms can be tested per dish on 3 replicate leaves and a central disk is left uninoculated (control).
- Allow the agar to finish solidifying (about 10 more minutes).
- Use a sterile swab to transfer your organism(s) from broth to leaf disk (make 3 replicates for each organism). If your organism is on solid media, take a small amount of pure colony and suspend it in sterile water and use that to swab over each leaf-agar surface in all directions to uniformly and thoroughly cover the leaf disk surface. Be gentle so you don't displace the leaf disk. Discard the swabs in your autoclave bag.
- Incubate plates at RT after you seal the edges with parafilm and put them in a zip lock bag. Check at least once a week for evidence of leaf breakdown or for dehydration. You may add a few drops of sterile water if the plates appear to be drying out. Keep checking over at least 4 weeks.
- When you think you see evidence of leaf breakdown use a dissecting scope to see more details and draw and record your observations. You might try scoring the degree of breakdown using a 1-5 scale (1=no change in leaf disk to 5= leaf tissue highly digested).
-
If an organism that you expect will degrade cellulose is growing poorly try using some oatmeal agar (a cellulitic media) if available.(see: Enrichment Media for Soil Bacterial from Mixed Populations )

Ammonification by soil microbes
As plants and animals die and decay in the soil, the nitrogen stored in organic molecules, (such as the amino acids of proteins) needs to be retrieved. Some soil bacteria are able to convert proteins to amino acids and then digest the amino acids yielding ammonia. This process is known as ammonification. It is an important role of some soil bacteria because the ammonia other soil bacteria can convert ammonia to nitrite, others convert ammonia to nitrate, and some do both. Some bacteria even convert ammonia to Nitrogen gas. The following test assesses your bacteria of interest for their ability to convert protein to ammonia.
(Adapted from: Alacamo, Edward. 2001. Laboratory Fundamentals of Microbiology 6th ed. Jones and Bartlett Publishers. Sudbury, MA. p. 268-269.)
Materials:
The organism(s) to be tested in sterile peptone broth media in tubes in log phase or fresh, depression plates, Nessler's reagent substitutes (aquarium water test reagents for ammonia, nitrite and nitrate), glass slides (non-sterile)
Ammonification Testing PROTOCOL:
- Label a "control" tube of sterile peptone broth media. Don't do anything to it. You will use it for comparison later.
For each bacterial species being tested
- Inoculate a tube of sterile peptone broth with a loop of pure culture.
- Incubate all the tubes at RT for 48 hours
TEST for Nitrite, Nitrate, Ammonia:
(NOTE: you can perform 2-3 tests on each slide)
(NOTE: Because Nessler's reagent has a substantial mercury component, we are not using this toxic compound. We have available instead, the typical aquarium testing reagents that you can buy at pet stores. We have different reagents for testing for nitrite, nitrate and ammonia
Pour a small amount of your broth culture of one of your isolates into a microfuge tube and use your P200 to transfer 50μL of culture from the microfuge tube to the reagent drop.
Amount of Ammonia Present/ Incubation Time

Antibiotic production
Many microbes secrete antimicrobial compounds to help them compete with other microorganisms for habitat. Some of the bacteria that are common antibiotic producers are the Actinomycetes (including Streptomycetes species), many of the Bacillus species, and the fruiting myxobacteria, to name just a few among many, many antibiotic producing bacteria. You can also test for the opposite: the sensitivity of your soil organisms (or known stock bacteria) to manufactured or secreted antibiotics.
(This testing will take 3 weeks.)
PREPARATION
Week 1:
You need to plan ahead for this test. Identify how many potential antibiotic producers you might have (include any isolates of Actinomycetes, Myxobacteria, or Bacillus.
Using aspectic technique, transfer a small part of an isolated colony (possible Streptomyces, etc.) that's likely to be an antibiotic producer to your loop. Drag the loop (as shown below) down the middle of a plate of nutrient agar. Make a second plate exactly like the first for each isolate to be tested. Label them carefully and incubate the plates for ~1 week at RT.
Week 2
TO BE PROVIDED in LAB 6:
3 fresh cultures of Eschericia coli (Gram negative), Staphylococcus epidermidis (Gram positive) and Micrococcus luteus (Gram positive) grown in nutrient broth.
NEED TO MAKE (Optional): If you want to test any of your isolates for sensitivity to an antibiotic producer, start a log phase broth culture in appropriate media so that it will be ready to use in LAB 6.
PROTOCOL

- Use a sterile swab and aseptically apply a line of inoculation of each of the provided broth cultures of : E. coli, Micrococcus, and S. epidermidis. as shown below. Draw a line perpendicular to the antibiotic producer's (Streptomyces) inoculation. Be careful not to touch the antibiotic producer's growth.
-

- Repeat this procedure on another plate using broth cultures made of any of your isolates that you want to test for sensitivity to your antibiotic producers,
- Label a template in your notebook with which organism is where on each plate.
- Incubate for another week.

Week 3
- Examine the plate and look for evidence of inhibition of growth of "test" organisms near the antibiotic producer's midline streak.
- Draw the results and evaluate whether or not there was evidence that an antibiotic was produced by the organism and, if so, which of the bacteria tested were sensitive to it and to what degree. If you found no inhibition of growth, does that mean that your potential antibiotic producer does not secrete an any antimicrobial compounds? Why or why not?
Starch digestion
Starch, a polysaccharide made from glucose, is a plant storage molecule. It is found in two forms: a straight chain form, amylose, and a branched form, amylopectin. Organisms able to break down starch hydrolyze the polysaccharide to maltose (two glucose units) using the enzyme amylase. The disaccharide Maltose is then available for use by many other organisms. The amylase is an exoenzyme secreted by a variety of bacteria (and fungi). The digestion of starch can be observed by flooding an inoculated and incubated plate with Gram's iodine. Amylose will give a deep-blue color, amylopectins give a red to brown color. In many plant storage tissues (e.g potato root) a mix of both amylose and amylopectin are present. If the starch is digested, no color will develop in the areas of starch hydrolysis.
- Use one starch plate divided into 4 labeled and coded quadrants to test the ability of 4 organisms at a time to digest starch.
- Use the inoculating needle or loop to place a tiny amount of growth in one spot in the center of a a quadrant. Do not spread the inoculum at all.
- Incubate the plates for the appropriate amount of time.
- After incubation you should see a small but visible amount of growth in the area of the inoculum.
- Flood the plate with iodine and look for clear zones around the inoculum and dark blue areas where there is no growth or the growth was unable to digest the starch.
Links to Labs
Lab 1
Lab 2
Lab 3
Lab 4
Lab 5
Lab 6
Lab 7
Lab 8
Lab 9
Lab 10
Lab11
Lab 12