M465:16S rRNA gene sequencing: Difference between revisions
No edit summary |
No edit summary |
||
| Line 5: | Line 5: | ||
Today we will be cleaning up your PCR product, quantifying the DNA, and performing a big-dye sequencing reaction. This kind of sequencing uses Sanger chemistry (more information on that method can be found [http://en.wikipedia.org/wiki/Sanger_sequencing here] and will be covered in class. <br><br> | |||
=='''Clean up of your PCR product'''== | =='''Clean up of your PCR product'''== | ||
| Line 31: | Line 31: | ||
agent. ''<BR><BR> | agent. ''<BR><BR> | ||
Make sure your pcr product is clearly labeled! | |||
=='''Measuring the Quantity of DNA in your PCR product'''== | |||
We will measure the quantity of DNA in your cleaned up PCR reactions using the Synergy H1 spectrophotometer and a Take3 plate. The plate allows us to spot a very small quantity of your DNA (2 ul) on the surface of a glass slide and the spectrophotometer will measure the quantity for us. The Take3 plate can measure 16 samples at once so three of you can measure your PCR reactions from each of your 5 isolates each time. <br> | |||
The spectrophotometer will measure the DNA quantity by taking Absorbance values at A<sub>260nm</sub>. You can watch this video on using the Take3 plates [http://www.labtube.tv/playVideo.aspx?vid=119779 here] <BR><BR> | |||
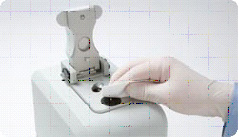
[[Image:nanodroper3.jpg]]<BR> | |||
<BR>'''Using the Nanodroppers'''<BR> | |||
1. Clean the upper and lower optical surfaces of the sample retension device by pipetting 2 microliters of clean deionized water onto the lower optical surface. Close the lever arm and tap it a few times to bathe the upper optical surface. Lift the lever arm and wipe off both optical surfaces with a Kimwipe. <BR><BR> | |||
[[Image:nanodroperclean.jpg]]<BR><BR> | |||
2. Open the NanoDrop software from the Desktop of the computer and select the nucleic acids module. <BR><BR> | |||
3. Initialize the machine by placing 1 microliter of clean deionized water onto the lower optic surface, lower the lever arm, and select ''initialize'' from the NanoDrop software. Once initialization is complete (~10sec.), clean both optical surfaces with a Kimwipe. <BR><BR> | |||
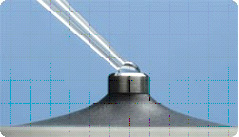
[[Image:sampleapply.jpg]]<BR> | |||
4. Perform a blank measurement by loading 1 microliter of Solution 6 (10mM Tris) and select Blank. Note that this blanking step may use something other than Tris depending on what your sample is dissolve in. Often the blank will be deionized water if you have concentrated your DNA sample already with the ethanol precipation and resolubilized it in water. <BR> | |||
''Note that as in traditional spectroscopy, the blank will be subtracted from subsequent measurements. If you want to determine the contribution of a specific buffer or diluent, measure the buffer first using distilled water as a blank. If the buffer does not contribute to the A 260nm reading, then deionized water will be fine to use as the blank. The water or buffer should always be measured to be sure that the instrument has been zeroed properly. The measurement of water or buffer should be zero or very close. All measurements are automatically normalized to 340nm.''<BR><BR> | |||
5. Measure the nucleic acid sample by loading 1microliter of sample and selecting "measure". Record your DNA concentration. Once the measurement is complete. Clean both optical surfaces with a Kimwipe and the machine is ready for the next sample. <br> | |||
''You should ensure that the appropriate constant (50 for dsDNA or 40 for RNA) has been chosen. The software automatically calculates the nucleic acid concentration. If the calculation is done by hand, the A260nm is represented as a 1cm path for convenience, even though 1-nm and 0.2nm paths are actually used during the measurement cycle.''<BR><BR> | |||
'''Clean Up''' | |||
When the last sample was been measured, clean the sampling device by repeating step 1. <BR><BR> | |||
Revision as of 13:38, 19 February 2014
Today we will be cleaning up your PCR product, quantifying the DNA, and performing a big-dye sequencing reaction. This kind of sequencing uses Sanger chemistry (more information on that method can be found here and will be covered in class.
Clean up of your PCR product
Before we can sesquence our bacterial 16s rRNA genes, we must remove interfering dNPTs, primers, and other small degraded DNA. We will use a column that separates DNA by size. Since the reagents and column materials in the kit we will use are proprietary, we won't know exactly what is going on at each step but, basicially, we will apply our pcr product to a column of a particular density, wash away elements too small to be trapped in it, and elute off the larger fragments of DNA (that should be ~1500bps if our pcr amplification of the 16s rRNA genes in our soil genomic DNA was successful).
Notes before Starting:
95% ethanol has been added to Buffer PE before first time use (see bottle label for volume).
All centrifuge steps are carried out at 17,900rfc (~13,000 rpm in a microcentrifuge) in a conventional tabletop microcentrifuge at room temperature.
Procedure
1. Add 5 volumes of Buffer PB to 1 volume of the PCR reaction and mix. Because our PCR reactions are 20 ul volume, we will be adding 100 ul of buffer PB to the tubes.
2. Place a QIAquick column in a 2 ml collection tube.
3. To bind the DNA to the column, apply the sample to the surface of the QIAquick column and centrifuge for 30-60 seconds.
4. Discard the flow-through and place the QIAquick column back in the same tube.
5. To wash, add 750 ul of buffer PE to the QIAquick column and centrifuge for 30-60 s. Discard the flow-through and place the column back in the same tube.
6. Centrifuge the column once more in the provided 2 ml tube to remove residual wash buffer.
7. Place each QIAquick column in a clean, 1.5 mL microcentrifuge tube.
8. To elute DNA, add 50 ul of buffer EB to the surface of the column - make sure to place this volume at the center of the membrane. Centrifuge the column for 1 minute.
9. The purified DNA should now be at the bottom of your 1.5 mL tube. Discard the column.
IMPORTANT NOTES for using this kit: Ensure that the elution buffer (EB) is dispensed directly onto the spin column membrane for complete elution of bound DNA. The average eluate volume is 48 μl from 50 μl elution buffer volume.
Elution efficiency is dependent on pH. The maximum elution efficiency is achieved
between pH 7.0 and 8.5. Store DNA at –20°C as DNA may degrade in the absence of a buffering
agent.
Make sure your pcr product is clearly labeled!
Measuring the Quantity of DNA in your PCR product
We will measure the quantity of DNA in your cleaned up PCR reactions using the Synergy H1 spectrophotometer and a Take3 plate. The plate allows us to spot a very small quantity of your DNA (2 ul) on the surface of a glass slide and the spectrophotometer will measure the quantity for us. The Take3 plate can measure 16 samples at once so three of you can measure your PCR reactions from each of your 5 isolates each time.
The spectrophotometer will measure the DNA quantity by taking Absorbance values at A260nm. You can watch this video on using the Take3 plates here

Using the Nanodroppers
1. Clean the upper and lower optical surfaces of the sample retension device by pipetting 2 microliters of clean deionized water onto the lower optical surface. Close the lever arm and tap it a few times to bathe the upper optical surface. Lift the lever arm and wipe off both optical surfaces with a Kimwipe.

2. Open the NanoDrop software from the Desktop of the computer and select the nucleic acids module.
3. Initialize the machine by placing 1 microliter of clean deionized water onto the lower optic surface, lower the lever arm, and select initialize from the NanoDrop software. Once initialization is complete (~10sec.), clean both optical surfaces with a Kimwipe.

4. Perform a blank measurement by loading 1 microliter of Solution 6 (10mM Tris) and select Blank. Note that this blanking step may use something other than Tris depending on what your sample is dissolve in. Often the blank will be deionized water if you have concentrated your DNA sample already with the ethanol precipation and resolubilized it in water.
Note that as in traditional spectroscopy, the blank will be subtracted from subsequent measurements. If you want to determine the contribution of a specific buffer or diluent, measure the buffer first using distilled water as a blank. If the buffer does not contribute to the A 260nm reading, then deionized water will be fine to use as the blank. The water or buffer should always be measured to be sure that the instrument has been zeroed properly. The measurement of water or buffer should be zero or very close. All measurements are automatically normalized to 340nm.
5. Measure the nucleic acid sample by loading 1microliter of sample and selecting "measure". Record your DNA concentration. Once the measurement is complete. Clean both optical surfaces with a Kimwipe and the machine is ready for the next sample.
You should ensure that the appropriate constant (50 for dsDNA or 40 for RNA) has been chosen. The software automatically calculates the nucleic acid concentration. If the calculation is done by hand, the A260nm is represented as a 1cm path for convenience, even though 1-nm and 0.2nm paths are actually used during the measurement cycle.
Clean Up
When the last sample was been measured, clean the sampling device by repeating step 1.
