Beauchamp:Caret
This article refers to Caret version 5.5
http://brainmap.wustl.edu/caret/
Caret can be downloaded and installed easily; MSB has the password.
Loading Caret/SUMSDB Surfaces into SUMA
The native Caret format is a binary .coord and .topo file for each surface. These must be converted before they can be loaded into SUMA. The easiest way to convert surfaces is from the command line using the GIFTI (.gii) format:
 /Applications/caret/bin_macosx64/caret_command  -file-convert -sc -is CARET resampled_to_PALS-TA24_Human_BUCKNER01.L.FIDUCIAL_AC-origin.afftrans_pass2.73730.coord \
 Human.sphere_6.73730.topo \
 -os GS buckner01_lh.gii
Then they can be loaded into SUMA:
suma -tsn GII pial buckner01_rh.gii
Surfaces can be converted using Caret's Import/Export feature in the File menu.
To import a surface, set the File type to FreeSurfer ASCII Surface File (*.asc). The structure, topology, and coordinates should also be set to the proper values.
Relative surface depth files can also be imported loading $h.curv from the surf directory of the FreeSurfer subject.
Creating Flat Maps
- Create a new spec file by selecting Open Data File from the File menu. Choose an Volume Anatomy Files (*.HEAD).
- Import the sphere, inflated, and smoothwm surfaces into a new caret spec file. Set the properties of the file at the bottom of the import dialog. All of the surfaces are closed, and the smoothwm should be loaded as the fiducial.
- Save imported files by going to the File Menu, Save Data File. Choose coordinate file (*.coord) for the file type and select the surface in the menu below.
- Import *.curv file from the surf folder in the FreeSurfer subject directory
- View the curvature by clicking the D/C button in the Main Window Toolbar.
- Set the Primary Overlay to the curv file in the Display Control Dialog.
- At the top of the dialog, select Surface Shape in the Page Selection Menu
- Click the Settings tab. Adjust the mapping parameters to get a good contrast (click Histogram if you are unsure of the range).
- Set the Main Window to display the sphere surface of one hemisphere
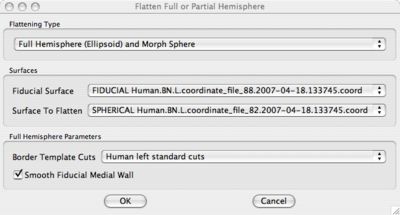
- From the Surface Menu select Flatten Full or Partial Hemisphere
- In the dialog set the Flattening Type to Full Hemisphere (Ellipsoid) and Morph Sphere. The spherical surface should be flattened.
Note: We're assuming that the origin of the surface has nothing to do with the flattening process. It is probably set to make the template cuts align with the surface.
- Set the Border Template Cuts to Human Standard Cuts
- For the left hemisphere, the options should look like this:
- Click OK to start the flattening process
Drawing the Medial Wall Boundary and Calcarine Cut Borders
See http://brainvis.wustl.edu/help/landmarks_core6/landmarks_core6.html for a description of the cuts.
- A new compressed medial wall surface should appear in the main window.
- Move the Continue Flattening Full Hemisphere Dialog to the side
- From the Window Menu, open Viewing Window 2
- Use the Model Selection Control to view either the inflated or the partially inflated surface
- Switch to a medial view by click the M button on the Viewing Window 2 Tolbar
- Click the View button in the Main Window Toolbar to make sure that Caret is in View Mode
- In Viewing Window 2, click around the boundary of the inflated surface's medial wall (the identified green nodes will help as a reference later)
- Click around the calcarine sulcus to identify it as well
- The identified nodes should look like this:
- From the Borders sub-menu of the Layers menu, select Delete Border With Mouse. Click the mouse over the existing medial wall and calcarine borders to delete them
- From the Borders sub-menu of the Layers menu, select Draw Border
- Click the Select nittpm amd in the Name Selection Dialog, choose MEDIAL.WALL and click OK.
- Click the Apply button on the Draw Borders Dialog
- In the Main Window start tracing the medial wall by holding down the left mouse button. At the end of the trace, release the mouse button, hold down the shift key and click the left mouse button again.
- Select Calcarine Cut from the Name Selection Dialog
- Draw a border along the calcarine sulcus starting from within the medial wall.
- Close the Draw Borders Dialog
- Close Viewing Window 2
- Click Continue Flattening on the Continue Flattening Full Hemisphere Dialog
- Click Continue Flattening in the Initial Flattening Dialog
- The surfaces should look like this:
- Click OK on both multi-resolution morphing windows. These parameters are assumed to work with most surfaces
Aligning the Surfaces to Standard Orientation
- Move the Align Surfaces Dialog to the side
- Close the Spherical Morphing Measurements Dialog and the Flat Morphing Measurements Dialog
- Click the Reset button the Align Surfaces to Standard Orientation Dialog
- In the Main Window click the ventral tip of the Central Sulcus
- Press the Shift Key and click the dorsal-medial tip of the Central Sulcus. Check to make sure the X and Y values have been set for each node in the dialog.
- Click the Apply button in the Align Surfaces to Standard Orientation Dialog.
- Close the Align Surfaces to Standard Orientation Dialog
Saving the Surface Files
- From the File Menu, select Save Data File
- Set the File type to Coordinate Files (*.coord)
- Verify that Coord File is the CYCLE5_OVERLAP_SMOOTH
- Set the Coord Frame to Cartesian Standard
- Set the Orientation to Left,Posterior,Inferior
- Click the Save button
- Export this surface to a FreeSurfer file (*.asc)
Viewing in SUMA
See the post on the AFNI message board:
http://afni.nimh.nih.gov/afni/community/board/read.php?f=1&i=21361&t=21361#reply_21361
References
Referenced pages 36-45 of Caret's Tutorial:
http://brainmap.wustl.edu/caret/pdf/Caret_5.5_Tutorial_Segment.pdf
Also see pages 12-17 of Caret User's Guide and Tutorial Part 2:
http://brainvis.wustl.edu/caret/pdf/CARET_UsersGuide.03-06.Part-II.pdf
'*.col' files can be converted using the Matlab roi2rgb_paint.m on data6


