M465:16S rRNA gene
In order to identify the microbes colonizing your flies, we will use the 16S rRNA gene. You will amplify this gene from isolated colonies (after streaking to isolation, below) using colony PCR. We will then clean up that amplicon, perform a Sanger sequencing reaction, and learn how to use the resulting sequence data to figure out who this microbe might be. Today, you will be using your LB and MRS dilution plates from last weak to streak to isolation first.
Protocol for Streaking to Isolation
During our last meeting you plated isolates onto either MRS or LB agar media. These colonies have grown up at 30C, under aerobic conditions you counted them (see above). In order to identity who these organisms are, we need to ensure that you have well isolated, individual colonies. For that reason, we will pick five colonies on your original plates (5 total!) and re-streak them for isolation (protocol below).
Your agar plates can be streaked using a three-phase or a four phase pattern (Figure A-1). YouTube Demo | http://www.youtube.com/watch?v=foVPx5L3dKY&feature=PlayList&p=AB6C2197E755C3EC&index=5
The handling of the plate can be accomplished in a number of ways, all of which attempt to minimize possible contamination by either keeping the lid over the plate or by keeping the plate upside down (Figure A-2).
Isolation streak technique: from plate to plate.
1. Follow the protocol for aseptic transfer you learned last Monday. If using a loop, sterilize it in the incinerator and allow the loop to cool for a few seconds. Let the loop cool! You can rest it on the holders set into the base of the incinerator. Count 1 minute. Not allowing any cap to leave your hand, touch your cooled loop to a single, well isolated colony of bacteria on a streak plate.
2. Using the loop, streak the first section of the plate using tight sweeping lines that stay within that section: (1/3 for a 3-phase pattern) or (1/4 for 4-phase) of the plate. It is fine to overlap your streaks in this section. (Fig A-3)
3. Sterilize the loop and allow it to cool for 15 seconds. Protip: Touch the loop to an unused edge of the agar surface to cool it completely before continuing.
4. Pull the loop through the previous streak (section 1) one or two times to re-inoculate the loop with cells. Now streak section 2 of the plate, avoiding section 1 after the first 1-2 streaks and trying not to overlap the streaks (Figure A-4).
5. Sterilize the loop and allow it to cool in the air for 15 seconds. Protip: Touch the loop to an unused edge of the agar surface to cool it completely before continuing.
6. Pull the loop through one edge of the streak in section 2 of the plate to obtain inoculum. Now streak the 3rd section of the plate.
7. Sterilize the loop and repeat 5 and 6 until you complete inoculating all sections of your plate. Incubate and look for isolated colonies that have grown from one cell (Figure A-5).
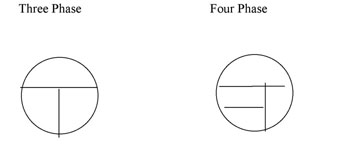
Figure A-1: Two patterns for labeling the bottom of a plate for Isolation Streak technique. The inoculating loop is sterilized between each section and inoculum is taken from the preceeding section to an uninoculated section of the plate.
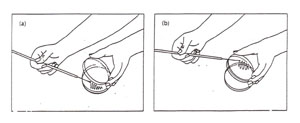
Figure A-2: Two options for aseptic transfer into a plate. (a) Streaking a plate while holding the lid ajar. Note that the lid shields the agar from airborne contamination: (b) streaking a plate while holding the bottom of the plate. Note that the agar surface faces downward, thereby minimizing contamination from the air.
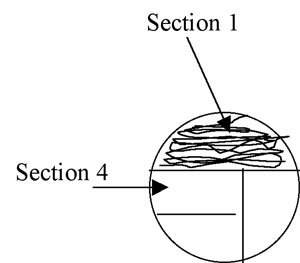
Figure A-3: Pattern for isolation streaking section 1 of a plate.
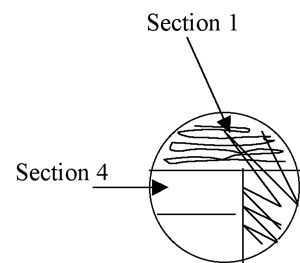
Figure A-4: Illustration of isolation streak technique section 1 to section 2.
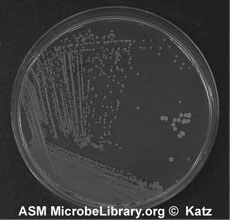
Figure A-5: An example of growth 24-72 hours after isolation streaking a plate to obtain isolated colonies.
